Warning: Cannot modify header information - headers already sent by (output started at D:\Inetpub\vhosts\facturation-facturatie.be\easyforyou.fr\EN\helpprinthelp.php:4) in D:\Inetpub\vhosts\facturation-facturatie.be\easyforyou.fr\EN\helppage0.php on line 2
Warning: Undefined array key "style" in D:\Inetpub\vhosts\facturation-facturatie.be\easyforyou.fr\EN\helppage0.php on line 3 Inventory stock control software invoicing management include tracking systems billing barcodes Help
Warning: Cannot modify header information - headers already sent by (output started at D:\Inetpub\vhosts\facturation-facturatie.be\easyforyou.fr\EN\helpprinthelp.php:4) in D:\Inetpub\vhosts\facturation-facturatie.be\easyforyou.fr\EN\helpdocument.php on line 3
Warning: Undefined array key "style" in D:\Inetpub\vhosts\facturation-facturatie.be\easyforyou.fr\EN\helpdocument.php on line 4 Inventory stock control software invoicing management include tracking systems billing barcodes Document
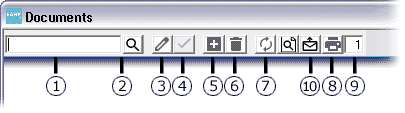
Click on the search button to select a customer or supplier.
(To imput a new customer, type his name in the field located on the left of the binoculars (search button) and validate with the Enter key from your keyboard. Then, click on YES for adding the customer. Input the data and to finish, validate the data of the customer with the F10 key or click the OK button)
Click on the to generate the new document.
The focus goes automatically in the body of new document. Click on the button to select a product and press the ENTER key of your keyboard to confirm and pass to the following column.
(To input a new product, type its Code in the column Code and press Enter on your keyboard to validate. Then, click on YES for adding the product. Input his data and to finish, validate by pressing the F10 key of the keyboard or click the OK button)
Note: If You want to add products in a document, a RIGHT click on the activates a search by secondary Code.
If needed, adapt the quantities, price... If You have the package STOCK CONTROL, the products quantities are automatically updated when you create invoices.
To add lines, click on the or DOWN arrow or F2 Key of the keyboard.
To finish: save the document by clicking on the or F10 key. For printing the document: click the or F7 key.
IMPORTANT: Do not forget to use the RIGHT-click of your mouse to activate the contextual menus.
To add or modify the products quantities in your inventory,
to modify the products quantities in your inventory, create a supplier Invoice or inventory document:
1) Click the button "Purchase" in the toolbar.
2) Click the tab "Purchase" or "Inventory".
3) Top left, type "REG" like supplier (REG = supplier Code for the inventory).
4) Click the button "+" in the toolbar to add a new document.
5) If the product exist already, in the body of the document, simply select the product with the search button and update the quantity to be returned in stock (Use negative quantities to reduce the stock).
6) If the product does not exist, type the new Code in the body of the document, then type "Enter" and allow to "add the new record". In the document input the quantity to be entered in stock.
Note 1: Outgoing stock automatically accounted for by either the sales invoices, receipt, picking ticket or cash-register.
Note 2: Inventory and products valuation can be accessed from the menu List->Products (check inventory) then press button "OK".
To browse All the type of documents, double-click in the field "Customer" The documents post themselves by order of number (most recent above).
Functionality s of the CODE field:
Input the Code of a customer or existing supplier then ENTER
or
To search: Type the first letters of a Code followed by * (wildcard) then press ENTER or type its VAT ID number then ENTER
or
Click on the search button to select a customer or supplier then click on the button + or function F2 key to add a new document.
For posting All the types documents for only one customer, carry out a "Research customer" or double click the name of a customer posted in the grid of the documents.
Click the right button of your mouse on the search button to find the document by amount
Click the right button of your mouse to insert a new out of sequence document number
The selection cursor is used to filter the number of documents resulting from a query. Note: The smaller the value, the faster the search, however, the former documents will not be posted.
Select the documents to be copied, for example the open orders of a customer while clicking (+ CTRL) in the margin of the grid of the documents.
Click the right button in the menu "Copy-To", there You can choose the Type document towards which You will gather the selected documents (for example FT1 to copy to a new Invoice).
The copied Orders will be placed in statute "Closed". For each product in the document the stock" Quantity in Order" will be automatically updated.
To create new Package: On the encoding of the products in a document, click the right button and choose "Save Package"
The whole of products and/or texts present in the document will be saved as a Package and can be restored (loaded) in another document.
To restore a Package: in case of the encoding of the products in a document insert a blank line, click the right button and choose "Load Package".
The whole of products and texts present in the Package will be recovered in the active document. For example, do not check "Price". In this case the active prices from the products will be taken by default.
In the body of a document, if the cursor arrives at the price level press F1. A window posts you then:
On left, the various prices in progress in the products At the right, the history of the sales for the active customer in the document and for the active product. Down field which allows the encoding of a price VAT-included.
You can click on one of the prices of left or one of the old prices of the history to restore it in the document.
During the encoding of the lines in the body of a document, click the right button and to choose the menu "Insert text", in the window type your text. Note: use the key "Insert" of the keyboard to insert blank lines.
You can save texts (complimentary closes etc?) by using the right button and the menu "Save Package".
To create new texts "type", use simply the body of a new document "OP1-Price-Offers". Type your text in the document body and click the right-button to choose "Save Package".
The "Closed" documents are for example: Invoices having printed or sent by e-mail. Orders having been copied towards one Invoice. See Files->Documents settingss-> fields "Closed for..."
The open documents are All those which "Are not closed"! ;-)
For the encoding of a PAYMENT in a closed document, Click on the doc.number, after, click right and make your choice -> Payment
Look also in Help Menu->F.A.Q. (Frequently Asked Questions)
To correct an error in an document, click the menu: Edit->Doc. Reopening
If you want to modify the layout of a document, go to menu :
File->Company to insert a logo or modify the head of your document.
See also the menu Tolls->Parameters->Printing.
You can also using an HTML editor such as Front-Page or Dreamweaver .
To edit the file LAYOUTMOD.HTM (copy from layout.htm) in your folder [cprogramfiles]. Look also Menu Help->F.A.Q. # 17
Concerning the Pricelist, see option: EFYLAYOUT.
If you are not familiar with an HTML editor, see option: EFYLAYOUT+EFYLAYOUT2
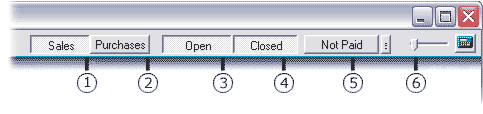
The "Not paid" button gives you real time information concerning unpaid invoices and customers debit balance.
Usual type of payment for this customer or supplier. Notice: In a document, if the type of payment is encoded, the document is regarded as "already paid" and is no longer a part of the "Unpaid" documents.
For the encoding of a PAYMENT in a closed document, Click on the doc.number, after, click right and make your choice -> Payment
Look also in Help Menu->F.A.Q. (Frequently Asked Questions)
To correct an error in an document, click the menu: Edit->Doc. Reopening
Printing of the type of payment in a NOT paid document : to choose in the menu : File->Customer->Payment
The calculation of the VAT (sales tax) will be done according to the VAT ID code included in each line of a document.
When adding a product line in a document, if the currency of the document is the currency used by default in the Tools->Parameters->General->Currencies, the VAT ID code used by default will be the one used in the product form, The TaxID taken by default is the one present in the File->Product , in other cases, the VAT ID code taken by default will be the one present in the File->Currencies->VAT ID code.
When adding a new product in the File->Products, the VAT ID Code by default will be taken in the Tools->Parameters->Accountancy->VAT ID Code Sales and Purchases.
The Back-Order tab lists the OPEN orders of all customers (or suppliers for purchases)
BO=Back-Orders (orders that have not been delivered yet)
TO CREATE A PARTIAL DELIVERY :
Under the back-order tab, select the specified customer by double-clicking the corresponding line of the document.
For each product, enter the quantity to be delivered under the column "delivered" (the only column you can edit) and press the F10 key to validate the whole operation
To generate the invoice corresponding to these products and to remove them from the inventory: click Code customer and then click the right button of your mouse and choose "copy to" invoice or picking ticket
Note :
Only the lines corresponding to a fill in delivery disappear from the table after invoicing.
The corresponding order is automatically closed when the total of the products have been delivered.
Printing or the pre-visualisation shows the quantity left to deliver
Warning: Cannot modify header information - headers already sent by (output started at D:\Inetpub\vhosts\facturation-facturatie.be\easyforyou.fr\EN\helpprinthelp.php:4) in D:\Inetpub\vhosts\facturation-facturatie.be\easyforyou.fr\EN\helpproduits.php on line 2
Warning: Undefined array key "style" in D:\Inetpub\vhosts\facturation-facturatie.be\easyforyou.fr\EN\helpproduits.php on line 3 Inventory stock control software invoicing management include tracking systems billing barcodes Products
The Code of the product is a logical combination of characters and/or numbers making it possible to easily find the product in its file.
Example of Code of product:MOBNOK6610 MOB=abbreviation from mobile Phone, NOK=abbreviation of the make (Nokia), 6610=Code number
You will be able to establish the most appropriate encoding for the type of products or services you offer.
This Code will enable You to find a record easily by typing the Code or the beginning of the Code followed by the character * (wildcard).
Exemple: MOBNOK* type ENTER or F6, You find first *Nokia mobile phone in the list C.Ph. Nokia of the list in a window (scrolling) which lists the remainder of the recordings following alphabetically by Codes and accessible by the arrows keys.
SECOND Code OF SEARCH. Same as for the first, which would be, for example, a numerical Code or barcodes. This one could be a make or a supplier in order to facilitate search.
Note: If You want to add products in a document, a RIGHT click on the activates a search by secondary Code.
You can activate the printing of the second category for your documents in menu :
File->Documents settings->To print the secondary Code
The description of the product will be restored in the respective language of your customer or supplier during the encoding of your documents (invoices, Price-Offers... etc).
It is not necessary to encode the descriptions in All the languages. Example, if You choose a description in English for your products, it will be automatically taken again by defaults in the other languages.
This value is proposed by default during the creation of a document and can always be adapted.
The SUPPLIER, if already existing in the database of the suppliers, will be sought by the traditional formula (the first letters of the Code followed by a * - wildcard) or if it is new, it can be added here.
In the event that the Code does not exist , the software asks You whether You wish to add the new Code and will pass automatically into the management of the suppliers. If You do not wish to note supplier code, use the Code "ME"
For VAT CODES, values will be proposed by default (see Tools - Parameters)
If the postal code suggested is not appropriate, type one * (wildcard) then ENTER, a window appears with All the disposable codes. You have the possibility to create a new code.
The calculation of the VAT (sales tax) will be done according to the VAT ID code included in each line of a document. When adding a product line in a document, if the currency of the document is the currency used by default in the Tools->Parameters->General->Currencies, the VAT ID code used by default will be the one used in the product form, The TaxID taken by default is the one present in the File->Product , in other cases, the VAT ID code taken by default will be the one present in the File->Currencies->VAT ID code.
When adding a new product in the File->Products, the VAT ID Code by default will be taken in the Tools->Parameters->Accountancy->VAT ID Code Sales and Purchases.
The Counterpart (general accounts sales and purchases in accountancy) can be can be used for possible connection of "Easy For You" to an accountancy software.
The default code can be modified in the menu Tools -> Parameters.
The COUNTERPART and Ledger account (general accounts sales and purchases in accountancy) can be encoded and can be used for a possible connection of "Easy For You" to accountancy software.
The default code can be modified in the menu Tools -> Parameters.
The Code of the product is a logical combination of characters and/or numbers making it possible to easily find the product in its file.³
The MINIMUM QUANTITY and OPTIMAL will be used to print a list of the product to be ordered.
OPTIMAL QUANTITY = ideal Quantity in stock. (If stock passes in minimum lower part of the quantity, the order supplier proposed in the list of the products will be equal to the optimal quantity minus the quantity available round to conditioning.
CONDITIONING makes it possible to automatically round the quantities in the lists of products to be ordered to the suppliers. See menu File->Documents settings->Document default quantity = Packaging quantity
The QUANTITY ORDERED = Total quantities of products in the OPEN customer orders or to also suppliers. Check the menu Tools->Reorganisation->Recompute of the quantities in open orders, RMA and composed produts
The two fields "Under repair" post the quantities of parts under repair belonging to the customers and to the store.
To modify the products quantities in your inventory, create a supplier Invoice or inventory document:
1) Click the button "Purchase" in the toolbar.
2) Click the tab "Purchase" or "Inventory".
3) Top left, type "REG" like supplier (REG = supplier Code for the inventory).
4) Click the button "+" in the toolbar to add a new document.
5) If the product exist already, in the body of the document, simply select the product with the search button and update the quantity to be returned in stock (Use negative quantities to reduce the stock).
6) If the product does not exist, type the new Code in the body of the document, then type "Enter" and allow to "add the new record". In the document input the quantity to be entered in stock.
Note 1: Outgoing stock automatically accounted for by either the sales invoices, receipt, picking ticket or cash-register.
Note 2: Inventory and products valuation can be accessed from the menu List->Products (check inventory) then press button "OK".
See menu:Tools->Reorganisation->Recompute your stock quantities according to the sales, purchases documents and Back-Orders.
Purch. Pr.
Corresponds to the product price given at the encoding of the last purchase Invoice.
Cost Price
Calculated for a product according to the total value of the quantity in stock added to the total value of the last purchase Invoice, the whole divided by the total quantity of the products (balanced average price).
Price (1,2,3,4,5)
The 5 SELLING PRICES are calculated by default according to the margins established by default in the menu Tools -> Parameters.
Example of Code of product:MOBNOK6610 MOB=abbreviation from mobile Phone, NOK=abbreviation of the make (Nokia), 6610=Code number³
Margin (1,2,3,4,5)
You can also directly encode the desired profit margin, and the software calculates the selling price.
See menu:
Tools->Parameters->Products->Margin
ATI (1,2,3,4,5)
On right-hand side, You have the Price including the taxes.
By quantity
Decreasing tariff per quantity.
PS. In the product form, to avoid the curiosity of some, the cost prices and purchases prices can be hidden by means of the button
This value is proposed by default during the creation of a document and can always be adapted.
Allows encoding of products with length (meter) squares meters M2 For these products, the price selling can be done by panels or lengths and with the purchase per meter or m2.
When you print a document, the of the products weight is printed on the bottom.
See menu:
File->Documents settings->Weight
Tools->Parameters->Products->Unit of weight
If a product is already used in any document, it is not possible any more to erase it because of the relations established between products->document. In this case, please check this box, the product will disappear from your lists, selections and E-Commerce.
This field can contain specific codes for your company in order to carry out a personalised filtering, to mark or to classify some products. In the lists product, customers or movements, the selections of extractions or tracings are laid down.
Example for the sizes and colors: In this fields, for a product of size 34 and red color note: S: 34/C: R
During the encoding of a document, since using the advanced search for a product (binoculars), in research on the additional fields, if you note T: 34 + ENTER research posts you the products of size 34.
If you note S: 34/C: R + press ENTER The research posts you the red products of size 34. It is possible to combine this research with the categories field, the wording, supplier, Codes of the required product.
All this selections are also possible in menu List->Movements
To add a picture to your product: copy your image file to the folder [cprogramfiles]\Images and rename it as your product Code (productCodejpg or .gif)
See menu:File->Documents settings->Print pictures on documents
See menu:Tools->Parameters->Products->Reduction for printing pictures
If you have the module EFYESHOP, all your products pictures are automatically available in your e-commerce.
This Code will enable You to find a record easily by typing the Code or the beginning of the Code followed by the character * (wildcard).³
See menu:File->Category
Warning: Cannot modify header information - headers already sent by (output started at D:\Inetpub\vhosts\facturation-facturatie.be\easyforyou.fr\EN\helpprinthelp.php:4) in D:\Inetpub\vhosts\facturation-facturatie.be\easyforyou.fr\EN\helpclifou.php on line 2
Warning: Undefined array key "style" in D:\Inetpub\vhosts\facturation-facturatie.be\easyforyou.fr\EN\helpclifou.php on line 3 Inventory stock control software invoicing management include tracking systems billing barcodes File Customers & Suppliers
The Code of the customer is a logical combination of characters and/or numbers making it possible to easily find the customer in the Customer file.
Example:CAYMANPARTNER for "CAYMAN & PARTNERS". This Code will enable You to easily find a customer by typing the Code or part of this Code followed by a wildcard (*).
Example, after You have encoded the customer, type: CA* to carry out a search, then key ENTER or Tab.
You will see a window containing All the customers classified alphabetically starting from CA , Just point to the customer using the arrows then ENTER or click the mouse at the customer s name.
VAT ID#
For certain countries, clients will have a VAT ID number. If this is the case, the encoding of the VAT number will be controlled by a mathematical formula that won t accept wrong numbers. The first two characters determine the country or dep.
General information
The usual and indispensable like Name, Address, Phone, etc
Additional Fields
This field can contain specific codes for your company in order to carry out a personalised filtering, to mark or to classify some products. In the lists product, customers or movements, the selections of extractions or tracings are laid down.
Turnover
Total amount net of VAT for this customer or supplier of closed invoices less the credit-notes. The update turnover is done at the time of the first printing of the doc. By reopening the document, the opposite operation occurs.
See menu:Tools->Reorganisation->Turnover
customer(s) or Supp.
Balance
Total VAT amount All- inclusive less the deposit of the customer or supplier for All the documents whose payment type is not filled. The update is effective when the payment is encoded.
See menu:Tools->Reorganisation->Balance
customer(s) or Supp.
Listing Intrastats
The INTRACOM CODE, country code and transport will be used to establish your Intracom listing automatically.
Limit
This field makes it possible to limit the authorised maximum credit limit for a customer. This credit is calculated on the basis of total of the open sales and not paid documents. If this field is to 0, EasyForYou does not take use the limit.
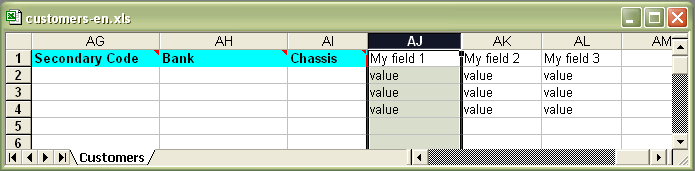
Secondary Code
This Code can be that of the customer used in another accountancy software.
Language
It is the customer s language which will be used to generate and to print the documents. This can be different from the language of the user.
Currencies
It is the currency which will be used again by default at the time of the addition of a document for this customer or supplier. The currency rate can be modified in the document.
This value is proposed by default during the creation of a document and can always be adapted.
With the creation of a new document, if the currency of the customer is different from the currency by default (Tools - > Parameters), the VAT ID codes of the currency record precede.
Payment
Usual type of payment for this customer or supplier. Notice: In a document, if the type of payment is encoded, the document is regarded as "already paid" and is no longer a part of the "Unpaid" documents.
This value is proposed by default during the creation of a document and can always be adapted.
Printing of the type of payment in a NOT paid document : to choose in the menu : File->Customer->Payment
Discount
This discount will be used again by default on All the documents drawn up with this customer or supplier. This discount remains adaptable in the document.
This value is proposed by default during the creation of a document and can always be adapted.
Salesman
This code is used to calculate the profits made by a salesman or to list the customers of a salesman etc
Due date
Number of days for the automatic calculation of the expiration date of the documents.
This value is proposed by default during the creation of a document and can always be adapted.
Number of copies
Default number of copies to print the documents for this customer.
This value is proposed by default during the creation of a document and can always be adapted.
Price Level
The customer Price-Level from 1 to 5 is related to the selling price from 1 to 5 in the Product-Form. If a customer is allotted code 4 for product added in a document, price level 4 which will be used by default
This value is proposed by default during the creation of a document and can always be adapted.
Counterpart
& Ledger account
The COUNTERPART and Ledger account (general accounts sales and purchases in accountancy) can be encoded and can be used for a possible connection of "Easy For You" to accountancy software.
The default code can be modified in the menu Tools -> Parameters.
This value is proposed by default during the creation of a document and can always be adapted.
Category
The category of a customer can be related to one or more categories of products for a specific calculation of the price of the products by category. This field allows show specific categories according to the customer in the E-Commerce
See menu:File->Categories->Customer (Category
E-Shop)
Password
Input or modify here the password which makes it possible your customers to place order with the E-commerce (EFYESHOP) The login for E-commerce is the customer Code.
Special pricing - Product by customer
In this field, put the number of a document in which you can encode products with special prices.
At the time of a sale relating to the customer, if one of the market products is present in the referred document, it is this price (and discount) of the referred document which will be shown and which will have priority on the other price calculation.
Code,Description,Quantity,Order,Price,PTTC,Supplier,Additional Fields,Category,Code 2,Code 3|Search by product code File Categories
Code
This Code will enable You to find a record easily by typing the Code or the beginning of the Code followed by the character * (wildcard).
Description
The category description will be restored in the menu of E-shop (EFYESHOP) in the respective language of your customer
Type 1) Price
Note here the price that you wish for all the products belonging to this category. This price will be calculated according to quantities from to without taking account of the original prices in the product form 2) Margin
Note here the margin that you wish by default for all the products belonging to this category. This margin will be calculated according to the quantities of with .without more taking account of the prices which are in the product form. 3) Category Margin
Input here the letter which indicates the curtomer category and the margin for all the products belonging to this category. 4) Category discount
Input here the letter which indicates the curtomer category and the handing-over which you wish for all the products belonging to this category. * See menu:File->Customer(s) or Supp.->Category
Customer (Category E-Shop)
Note here the letters which indicate the customer categories which have the right to see this category of products on your E-commerce (EFYESHOP).
See menu:File->Customer(s) or Supp.->Category
Visible E-Shop
If you do not check this box, this product category will not be visible on your e-commerce (EFYESHOP - E-commerce).
Print labels
Print the labels of the products during the printing of the documents. The number of labels is equal to the quantity of products in the document.
Only one label
To limit the numbers of printed labels to one.
Inventory stock control software invoicing management include tracking systems billing barcodes File Documents settings
The various Type documents are posted in the tabs of the management of the documents.
Code: Integrated in the # of each document in order to facilitate their identification.
Type: the type of newspaper will determine the influence on inventory like on the sales turnover and the balance of the customers.
Example: The documents with type "Invoice" influence the stock with the encoding of a product, their sales turnover and balance are updated at the time of the first printing or sending by e-mail.
The documents with the type "Price-Offers" do not influence stock, nor the turnover, it is thus a type of document in which You can quietly carry out tests of encoding without causing errors in your stock.
Name: Represents the Name of the document which will be printed according to the language of the customer.
Message: It will be printed on the bottom of each document from this type, this field can remain empty.
Order: Determines the order of the tabs of the document management. These numbers are spaced in order to be able to easily Insert new type of documents.
Visible: Makes it possible to make show/hide the various columns of the products details datagrid in the document management.
Classification: During the creation of the first document "Easy For You" will base itself on this number in order to generate next document.
Use the deleted doc.numbers: If this option is checked, Easy For You recovers the document number from deleted documents to keep in number sequence (invoices...).
Print pictures on documents
Print Screen of the current record
Print labels
Allows, in addition to the printing of a document, to print on a third printer, labels intended for the various products present on the document
PrintingNot detailed
When printing a document, print only the great total.
Thus do not take again the detailed price for each product.
Encoding of the mode of payment obligatory before the printing
Give a warning message, if a document is printed or sended by e-mail whereas the user forget the to input the type of payment
Recover the document numbers where total = 0
Give a warning message if a document is printed whereas the total amount is to zero.
Recover the deleted document number
Allows automatically to recover the number of a document when it is deleted in order to maintain the sequential order.
Do not print the totals on documents
Do not print any price on the document. For example, can be used for the delivery notes.
Print the total discount on the documents
Print the total amount of the discount on the bottom of the document, calculated on the difference between the price1 and the applied selling price.
PrintingSerial/Batch Number
When printing a document, print the serial numbers.
Encoding price VAT.Incl.
Allows the input of prices including all taxes, can be useful in the event of encoding of a receipt, in this case, where the prices charged are in general prices including all taxes.
To print the secondary Code
Frequently used for printing the purchase orders intended for the suppliers.
The principal Code of the product is your Code and the secondary Code is the product Code used by your supplier.
Serial/Batch NumberPlease enter a value for the field
Prevents by a warning message if a product is encoded in a document and the user forgot the encoding the serial number.
Document default quantity = Packaging quantity
During the encoding of a product in a document , takes by default the quantity of the conditioning from products data. Useful for the suppliers orders.
Jump automatically to the next line after add a new product
Go automatically to the next line when input a product Code in a document
Manage the EcoTax or Deposit
Activate the management of the special taxes or another supplement systematically dependent on certain products.
You can add several products ECOTAX1, ECOTAX2, ECOTAX3 (exactly like a product, in so far as its Code starts with ECOTAX or REPROBEL, it will be selectable in each products produced.
Note: Taxes ECOTAX, RECUPEL REPROBEL, BEBAT, AUVIBEL can be or not calculated according to a percentage of the price on which the tax is dependent.
Add the customer address if a document is copied towards this type document
When you copy a document towards another, the customer Code are added in the form of a comment. For example, when you copy a customer order to a supplier order, allows during the delivery of the supplier to identify for which customer the order was intended
Printing of transport data
Allows, in addition of the printing of the document, to print on a second printer, labels intended for shipment companies of express transport. (see FAQ number 9)
Print the amount in text
Print on the bottom of the document, the total amount to pay in all letters preceded by your specific text. (this text can be adapted in numbertotext.exe)
Link for secure payment by credit card on the document
When you send a document by e-mail (invoice or customer order), automatically adds a link to the bottom of the document in order to allow the customer by simple click, to carry out a payment by credit card.
Printer
If required, this field is intended for specifying the Windows name of the default printer, this in order to avoid the Windows Printer dialog menu when you print a document.
New VAT ID code can be added at any time based on new legislation.
Relationship of Products/VAT ID code/Currencies/Parameters:
Please specify beforehand the sales VAT ID code by default (those you use the most) in the menu: Tools->Parameters->Accounting->VAT ID code sales & VAT ID code purchases
Then specify these VAT ID codes in the menu:
File->Currencies, with the use of the binoculars, choose your currency by default (those you use the most which can be found in the menu Tools->Parameters->General->Currencies)
With the help of the binoculars, choose the record that corresponds with your currency, click OK and encode the VAT ID sales and purchase codes in the appropriate fields: File->Currencies->Vat id sales and VAT ID code purchases.
The VAT id codes that show up by default in the documents when adding products will automatically be chosen by the CURRENCY that is found in the customer or supplier record.
Example of an invoice VAT of 17.5%: Your company is British and your customer is British.
(To be verified-> Your currency by default is GBP)
In File->Customer, in your customer record, you choose the currency GBP
(To be verified->in File->Currency the VAT ID code is 17 for GBP, the currency of the record)
In File->Documents, when you encode the product in an invoice, the VAT ID code will automatically be chosen.
You may of course at any time replace it by another.
Example of an export invoice with 0%VAT: Your company is British and your customer is Thai and the payment is in EUR
(To be verified-> your currency is by default GBP)
In File->Customer, in your customers record, you choose the currency EUX
(To be verified-> In File->Currency of the record EUX, you have specified the VAT ID sales code EXP 0% (Export))
In File->Documents, when you encode a product in an invoice, it is the VAT EXP 0% that will be chosen automatically, which you may replace with another at any time.
The general accounts are used for a possible connection with an accounting package. File General accounts
The rate of the currency can be updated by encoding a document or with a Package that performs an automatic update by Internet
See Pricelist: EFYCURONLINE With the creation of a new document, if the currency of the customer is different from the currency by default (Tools - > Parameters), the VAT ID codes of the currency record precede.
Inventory stock control software invoicing management include tracking systems billing barcodes File City
Allows the input and the searching of the zip codes of your country.
This function is available during the input from a customer or supplier and allows a research by zip code or locality name.
Inventory stock control software invoicing management include tracking systems billing barcodes File Company
Following the reception of your licences, please do not modify the dark gray fields marked with an asterisk (*) without informing a point of sale of the software.
The clear gray fields can contain HTML tags.
You can or not integrate your logo (GIF or JPG) on the documents and to choose left, center or right alignment (Left and right side for the co-ordinates of the company) or not print a logo.
Do not forget to specify the size of your logo in pixel and for a good printing quality, please take an image of at least 150 DPI.
Login of the start of "Easy For You" can be activated in the menu Tools->Parameters The Password is not obligatory. Only the type of user "Administrator" has the right to modify certain parameters of "Easy For You".
Each user can choose his own language. In easy, the documents will be generated in the language of the customer or suppliers. The favourite document type (tab) of the user will be active at the start of "Easy For You". The change of language of a user becomes effective when you restart "Easy For You".
Daily backup at start-up:
With the first starting of the day, EasyForYou automatically carries out a backup your data and this on one week cycle.
Folder for your backup:
Destination for your automatic backup at the first daily starting. Choice a folder apart from your principal computer. For example a shared folder on another computer from your network, USB Memory stick, external Hardware-Disk
See menu: Help on the Internet -> F.A.Q. (Frequently Asked Questions) Nr. 2
At start-up, check and show the CUSTOMER orders to deliver:
With the first starting of the day, EasyForYou automatically checks the existence of orders from which the delivery date and shows all the selected open orders in the order-tab.
EasyForYou print or formats and sends its documents by e-mail (HTML or PDF). File E-mail
Converts the selected document in HTML or PDF format and sends it in Outlook, Windows Mail, Windows Live Mail and other email software that accepts copy and paste from a HTML document
You can also use your SMTP address to send mail directly without going through your email software.
To send PDF documents to your customers click File-> Email PDF OR RIGHT-Click on the E-Mail button.
To print documents in PDF format, we recommend the free version of PDFCreator.
Do not install version 2.x, keep the version 1.x on:
https://www.easy-for-you.com/pdf.htm
Generate PDF files How to print and send PDF files by Email:
To use the send PDF button (right-Click on the Email button), you have first to setup this function in Windows 10, please follow this procedure:
1) Click menu Help->Folder->EasyForYou Ok
In the open folder ...\EasyForYou,search and right-Click AddPrinter.exe (Run as administrator)
QUIT the software EasyForYou !
2) Navigate to Windows Start menu.
Click :Settings
Click :Devices in the Settings dialog.
Make sure you are in the section :Printers & scanners
Disable the setting :Let Windows manage my default printer by setting it to Off.
Click on your main printer and select :Set as default.
3) Restart EasyForYou and in menu Tools->Parameters->General Check E-mail With SMTP and clicl the button Setup E-Mail SMTP
Input your SMTP server in the field
Copy your email adress also in Bcc Email, In this way, you will receive a copy yourself to put un your :Send Email folder
If you need to send :Terms of Sales. With your unvoices (appends only with invoices),
you can make a PDF document like TermsOfSales.pdf and copy this file to the folder ...\EasyForYou
Put TermsOfSales.pdf in the filed :Attachment
Click the Send Test Button to check if the SMTP works fine.
If the Send Test lasts too long, then you have to setup the SMTP options in the frame :Options
Print the selected document. To integrate your logo, replace the file sochd.gif by your own logo and adjust its size in the menu company.
To modify the layout of the document - > look option EFYLAYOUT and EFYLAYOUT2 in the Pricelist.
Generate PDF files
How to print and send PDF files by Email:
To use the send PDF button (right-Click on the Email button), you have first to setup this function in Windows 10, please follow this procedure:
1) Click menu Help->Folder->EasyForYou Ok
In the open folder ...\EasyForYou,search and right-Click AddPrinter.exe (Run as administrator)
QUIT the software EasyForYou !
2) Navigate to Windows Start menu.
Click :Settings
Click :Devices in the Settings dialog.
Make sure you are in the section :Printers & scanners
Disable the setting :Let Windows manage my default printer by setting it to Off.
Click on your main printer and select :Set as default.
3) Restart EasyForYou and in menu Tools->Parameters->General Check E-mail With SMTP and clicl the button Setup E-Mail SMTP
Input your SMTP server in the field
Copy your email adress also in Bcc Email, In this way, you will receive a copy yourself to put un your :Send Email folder
If you need to send :Terms of Sales. With your unvoices (appends only with invoices),
you can make a PDF document like TermsOfSales.pdf and copy this file to the folder ...\EasyForYou
Put TermsOfSales.pdf in the filed :Attachment
Click the Send Test Button to check if the SMTP works fine.
If the Send Test lasts too long, then you have to setup the SMTP options in the frame :Options
The Packages are made of a whole of lines "details products" of a document. He can saved or charged beings.
To save a Package: Create a new price offer, add the products and the texts which must belong to the Package. Select the lines of the document while clicking in the left margin of the datagrid "details products". Then click the right button and click on "Save Package". Give a name has your Package in order to be able to Load-it later on. The name of a package can be a product CODE, in this case the package is automatically loaded. (This function can be used for creating long descriptions for the products)
Inventory stock control software invoicing management include tracking systems billing barcodes Edit Load Package
The Packages are made of a whole of lines "details products" of a document. He can saved or charged beings.
To load a Package: In your document, click the right button on the details product datagrid. In the context menu click on "Load Package".
Note: If You don't check "Take it back again - Prices", the program will bring up to date the prices of the products contained in your Package.
Inventory stock control software invoicing management include tracking systems billing barcodes Edit
Allows to paste the principal information of a copied product in a new product
Click the right button in the menu "Copy-To", there You can choose the Type document towards which You will gather the selected documents (for example FT1 to copy to a new Invoice). Edit Copy To
In a document, click the right button in the products datagrid on the line or You wish to insert a text. Type your text in the window and click on "Save" to integrate it into the document.
Note: If You wish save the texts in order to recover them later on, see help "Save Packages" and "Load Packages"
Inventory stock control software invoicing management include tracking systems billing barcodes Edit Add New
This list makes possible to see the various payments or deposit from your invoices
or tickets (only CLOSED) or orders (only OPEN).
This list is ordered according to the payment date a regroup by type of payment
with a sub-total.
This list can also recapitulate the cash movements.
Example: to add the payment of an invoice in the Cash-Register:
- Click the Invoices tab.
- Click the right button of your mouse on the document number from the paid invoice.
- In the menu payment, select the type of payment.
- In the form, type the date and the Code of the payment.
From now, the information concerning the payment of this invoice is visible in
the Cash-Register.
In the Cash-Register, click the button "Day Register" or "Monthly Register" to
visualise the fill in list of your transactions.
The addition of lines in the Cash-Register relates ONLY cash (no other
type of payments). At the beginning, the cash amount of the "Cash-Register" is
set to zero and is indicated by the first line: "Cash of the day dd/mm/yy".
Each day, a new document is automatically added by the software and takes again
the total cash from the previous day.
If invoices or orders are paid with cash, the following day, the first line of
the new document is "Cash-Register of the day dd+1/mm/yy". This will take the
total of the payments carried out with cash the day before.
Consequently, sometime, take time to taking away some cash. If not, your Cash-Register
reach big amount.
Example: to carry out some cash:
- In your Tab Cash-Register, add a line such as in a usual document.
- Type the Code "REG." like a product Code.
- Replace the description of this line with, for example: "Taking cash away for
the bank".
- Encode the amount and put the quantity to -1 (Negative = taking away, positive
= deposits)
To daily maintain the cash total of your Cash-Register, you can, for example,
input the various taking cash deposits or cash purchases like: "Cash away for
restaurant" or "Cash for fuel for my car"
Do not forget:
Purchases : Quantity = -1
Deposit : Quantity = 1
Inventory stock control software invoicing management include tracking systems billing barcodes Tools Parameters
Currency: Default Currency: It is this currency which will be used during the encoding of a new customer or supplier.
Auto-Unlock after: Auto-Save: Time in seconds after which data is saved automatically in the event of detection of NO - ACTIVITY by the user.
Use the Tool Tip Text:
To disable the tooltiptext
User Login at start-up: Login: If check in this box, "Easy For You" will force the user to identify himself when starting the program and request a password.
Not checked, "Easy For You", uses by default the name of the Ms-Windows user for the identification . Note: In this case there is no password on the Login from "Easy For You".
Product management by serial numbers:
To activate the serial numbers management.
See menu: Help on the Internet -> F.A.Q. (Frequently Asked Questions) Nr. 12
Display the calendar:
To show a calendar in then toolbox
ID Barcode:
Preamble identification character from using a barcode (F9 by default)
Thousand separator for printing:
When printing a document, print the thousand separator.
Activate the windows to calculate the cash to return when printing documents paid by cash:
Activate a window intended to calculate the cash to be returned to the customer in the case of it pays a document with cash.
Accounting
Ledger account sales: Ledger account purchases: Counterpart sales: Counterpart purchases:
The COUNTERPART and Ledger account (general accounts sales and purchases in accountancy) can be encoded and can be used for a possible connection of "Easy For You" to accountancy software. General Accounts by default: These are the accounts which will be used again during the encoding of a new customer, supplier or product.
VAT sales: VAT purchases: VAT Code by default: The VAT codes which will be used again during the encoding of a new product.
If the postal code suggested is not appropriate, type one * (wildcard) then ENTER, a window appears with All the disposable codes. You have the possibility to create a new code.
Generate the Invoice Reminders:
Customer(s) or Supp.
Default language for newly added customers: Default language: It is this language which will be used by default during the encoding of a new customer or supplier.
Category:
Default category when you add a new customer or supplier
Salesman:
Default salesman letter when you add a new customer or supplier
When printing a customer address, prints the country code in front of the zip code.:
When printing a document, the Zip code is printed before the locality
Printing address on envelope:
Parameters for the adjustments of the print position of the address during the printing of an envelope since the tools (envelope) in the menu File->Customer & suppliers.
Products
Margin cost Price:
Benefits in percents for the automatic calculation of the cost price compared to the purchase price at the time of the adding of a new product.
Margin price 1,2,3,4,5: Marge's by default: These are the margins which will be used by default during the encoding of a new product.
By quantity:
DECREASING PRICE SCALE for automatic calculation of product sales prices
See menu: Help on the Internet -> F.A.Q. (Frequently Asked Questions) Nr. 11
Average cost price:
Calculated for a product according to the total value of the quantity in stock added to the total value of the last purchase Invoice, the whole divided by the total quantity of the products (balanced average price).
Purch. Pr. for calculate Margin/Turnover:
During the encoding of a sale document , EasyForYou takes the purchase price in the place of the cost price.
Decimal points for the quantities:
When you encode a document, EAsyForYou takes two decimals for the input of a product
Unit of weight:
Unit of weight used for the products when printing documents.
Unit of volume:
Unit of volume in case of printing or calculation of the volume of the goods during the use of module EFYLW - Management of the weights and measures for the products
Unit of length:
Unit of length used for the products and printing documents.
Coefficient / Price / Weight:
In the body of a document, if the cursor arrives at the price level press F1. A window posts you then: The weight price of the goods according to this coefficient.
Reduction for printing pictures:
Percentage of reduction for the pictures of products during the printing of the documents.
Calculate prices according to length and width:
Allows encoding of products with length (meter) squares meters M2 For these products, the price selling can be done by panels or lengths and with the purchase per meter or m2.
Not to authorise negative stock:
Send a warning is the quantity of product become negative
Automatic update of the selling prices according the encoding of the purchases prices:
Automatic update of the various prices of the product form compared to the margins by default during the encoding of the cost price in a purchase invoice.
Take the purchase price in the purchases documents:
When you copy a document to another purchase document, takes the purchase price and not the cost price of the product form.
Preserve cost price has the copy of the documents:
When you copy a sale document to another sale document, the cost price of the original document preserves the cost price present in the document and do not take the price in the product form which could have changed.
Printing
Subtotal VAT:
Print the sub total for the VAT on the documents
Subtotal base rate VAT:
Print the sub total bases VAT on the documents
Paper 11 Inches:
To print on 11 inches paper size
Print date and time on documents:
Print the Date and Time on the bottom of the document
Automatic insertion of Code when copy documents:
When you copy a document towards another, generates automatically interns Codes (REFND) indicating the origin of the document and destination in order to improve the traceability.
To print the Codes (REFND):
Print the Code line (REFND) generated when you copy a document to another
Lines between the products:
When printing a document, prints lines between each products
Simplified document number:
When printing a document, set the format of the document number to AAAA/Number. Example FT1200500000245 simplifies becomes 2005/245
Sponsor:
This check-box intended to remove www.easyforyou.be on the documents cannot be un-checked in the free version or if you are dealer for EasyForYou.
The box "Sponsor" will be un-checkable at the purchase of a promotion and www.easyforyou.be will no longer appear on your documents.
Printer:
1) Optional field for the name of your default printer.
2) Optional field for the name of the printer intended for printing specific shipment forms. See file LayoutDHL.htm example
3) Optional field the Windows name of the printer intended for printing of labels (one by product) for sending of goods by mail.
* Take the Windows name of the printer
* See menu: Help on the Internet -> F.A.Q. (Frequently Asked Questions) Nr. 9
Whitespace document:
Adjustment of the left margin in millimetres for printing documents
Whitespace receipt:
Adjustment of the left margin in millimetres for printing small receipts
Number of lines in the body of the document:
Adjustment for the number of lines in the body of a printed document Also uset to set or adjust the page break when printing long document on several pages
Number of lines for the footer of the document:
To change the total bottom lines when you print a document
Document Title Colors:
HTML code for printing titles background on the documents
Print a discount calculated on the difference between price 1 and the selling price.:
Print a discount on the small sales receipt.
Receipt:
Printing from your receipts on format A4
Miscellaneous
On-line points of sale:
Activate the Point of Sales system as Client or Server.
Documents settings:
Type document Code of the destination for the orders placed with the points of sales (module EFYPDV)
Supplier:
IP Address from the server in the event of use of the points of sales (module EFYPDV).
Automatic calculation of the quantities to order:
Automatically calculate stock available at when you copy a customer order to a supplier order and generates only the missing products in the supplier order.
Automatic addition of comments in the orders:
When you copy a customer order to a supplier order, the available products are added for information in the form of remarks. These remarks will not be printed on the purchase order supplier but only visible on the screen.
LicenseBarcodes:
The your licence number in the event of use of EAN barcode type
SMTP:
Your SMTP adress to send your documents in case of use of ASPMail List->Documents->E-mail
Inventory stock control software invoicing management include tracking systems billing barcodes Tools Reorganisation
Advanced management can be activated if you click the checkbox "Activate the advanced
invoice reminder system
Three templates of reminders are available.
They are intended automatically to generate remind letters via the
Menu Tools->Generate the invoice reminders
OR via
Menu File->Users->Activate the automatic invoice reminder system.
Reminders are generated, with the first starting and this once per day. The genarator
print the remind letters to be sent for the unpaid invoices.
The remind letters of level 1 is generated automatically under the following conditions
(according to the language of the customer):
1) the invoice is not paid (the type of payment is always on "To be Paid")
2) In the management of the customers, the category of invoice reminder is NOT
on "No Invoice Reminder"
3) the due date of the invoice + the number of days indicated in the field "Level
1" (15 days by default) is exceeded.
The remind letters of level 2 is generated automatically under the following conditions:
1) Same as level 1
2) Same as level 1
3) the date of the first reminder (visible on the bottom of File->document)
+ the number of days indicated in the field "Level 2" (15 days by default) is
exceeded.
The remind letters of level 3 (formal warnings) is generated according to the
same principle as the remind letters of level 2 by holding account of the level
3.
Modification of the models of letters.
In the grid of buttons (3 levels and 6 languages) for editing the remind letters,
it is possible to edit the HTML templates while clicking on the corresponding
button.
Please check beforehand if A text HTML text editor is parameterized by default
in your Internet Explorer in your menu Tools->Internet Otions->Programs (By default,
Front-Page)
If layoutRxLL.htm (x=reminder level, LL=Language of the reminder) is not present
in then folder of EasyForYou, please download the files on https://www.easy-for-you.com/download/layoutRxLL.ZIP
By Checking the boxes "From level", you can parameterize dunning charges Or interest
rate which will be calculated starting from the due date and will be added in
the reminders.
The default category of invoice reminder will be taken again automatically when
adding of a new customer in EasyForYou.
Various functionalities related to the use of the reminders:
Since the management of the documents (only available in the invoices tab): Click
the "Not Paid" button, then click the right button of the mouse to filter and
to show only the invoices having a reminder of level X or to post only the generated
reminders this day.
A right click on the number of a document show the contextual menu, choose "Invoice
reminder" and the level wished to pass the invoice.
A right click on the printer button for printing a reminder letter (Same for the
email and preview buttons).
Inventory stock control software invoicing management include tracking systems billing barcodes Tools Scheduler
Task Scheduler: sert periodically to generate a document intended for one or more customers or suppliers.
Document: Encode the # of the document which will be used as template with periodic creation of new documents. Take a "Price-Offer" or a new document of the Type "Price-Offer" to generate the new templates.
To print: If You check this box, the new document generated by the scheduler will be automatically printed.
Customer or supplier: Caution! Be careful for the encoding of this selection. At the time of the specified periods, "Easy For You" will generate a new document with All the customer'smentioned again in your page of selections.
Type document: Encode the code of the "type document" (3 letters) where the new document will have to be created. For example FT1 (Invoice) to generate periodically an Invoice for a subscription with one or more customer.
Perform this task
Here You determine the moment or the task will have to be carried out. (the planner carries out a test of the tasks to be carried out during each starting of "Easy For You")
N.B.: The periodicity of the various tabs are not cumulative!
The very powerful tool of the selection from the additional fields: The additional fields of each customers, suppliers or products can be useful has to note a specificity in order to be able to find them in the lists, scheduler or margin calculation.
Example 1: To mark the customers having a contract service to Invoice quarterly. In the additional fields of the customer, note a specific Code, for example "/C3:CSQ"
To generate the quarterly Invoice, during the programming of your scheduler, it will be enough to: 1) Choice the template document. 2) Note "/C3:C" in the additional fields of the selection. 3) Choice destination document (FT1 - Invoices). 4) Choice the tab "Monthly" and check every three months to obtain a quarterly frequency. 5) Note the day of the month for which the document must be generated or check the box "Last day of the month".
Inventory stock control software invoicing management include tracking systems billing barcodes Tools Regroup documents
Allows the automatic regrouping (possibly gathered by same Code of customer or supplier) of a selection of documents.
For example, the automatic regrouping of the paid-open orders in invoices.
Inventory stock control software invoicing management include tracking systems billing barcodes Tools Update Prices
Export and import the products file (MDB)
(Necessary modules: EFYPRODIMPEXP)
Export the products in a database:
In EasyForYou, go to menu Tools->Export products.
EasyForYou will generates a file with MsAccess format (C:\Temp\ArtEFY.mdb) which
contains the whole of the products present in EasyForYou.
Importation of a new database:
After having exported C:\Temp\ArtEFY.mdb, take this database as structure
sample.
You can modify the price of the products present in ArtEFY.mdb, it will be updated
in EasyForYou during the re-importing.
To add new products in EasyForYou, respect the structure of ArtEFY.mdb. Carry
out a copy of ArtEFY.mdb in then folder c:\program files \easy for you while
taking care to rename the file to import as ART.MDB.
During the restarting of "Easy For You" the new products will be imported and
the price of the existing products will be updated.
Caution: following this operation, file ART.MDB will be
automatically deleted.
Please respect these recommendations for the import of new products:
In the field CLEF (product Code) , only numbers, capital letters allowed.
No spaces allowed in this field!
Only the sign "-" (less) is accepted in the field CLEF and CLE2.
In the fields texts, do not use apostrophes or star (*) .
For the quantities, not to update field QUAN (quantities) directly but to
pass by the encoding of the purchases - > Inventory.
Inventory stock control software invoicing management include tracking systems billing barcodes Tools Erase all the DEMO customers and products
Use this function to erase all the customers, suppliers, products and documents of the demo version in order to be able to begin with a clean software.
The update of the document number can be carried out in Files->Documents settings.
The selection criteria for the erasing of the demo documents, is the presence of the word DEMO in the additional fields of the products, customers or suppliers form.
Inventory stock control software invoicing management include tracking systems billing barcodes Tools Backup
This function makes it possible to carry out a backup of your entire database. This copy will be sent in the specified folder in your menu: File->Users->Folder for the backup.
Inventory stock control software invoicing management include tracking systems billing barcodes Tools Archiving
Click onto the menu Tools->Archive, archive the document in question. If you would like to reuse the document number, archive one document at a time and click onto YES to the question :Automatically recuperate the document number?
(Note: This operation will erase the document and the products will NOT be added back into your stock)
(See price list->module: EYFARC)
NOTE: This operation is irreversible!
Inventory stock control software invoicing management include tracking systems billing barcodes Tools Frequency meter for the trial version
This sheet compares the frequency of use of the modules with the
tariff page of our site in order to enable you to easily determine the best
version of the software or modules which are the most appropriate to you.
Inventory stock control software invoicing management include tracking systems billing barcodes
Several precautions to update successfully when using EasyForYou (on the network)
(Necessary modules: EFYUPDATE)
Procedure (single user)
If possible, make a backup in the menu Tools-> Backup ...
Shut down your computer and restart it and above all: do NOT start EasyForYou !
Download and run the update by clicking the button UPDATE
Wait until the update if finish and re-start EasyForYou.
Check the licenses, click File-> Licenses-> To download...GO ...
In the Menu Tools->Update software, check if the date of license is OK-> 20??, Otherwise click the menu Tools-> Calculation of the price of your update order the license.
In network you must insure at 100% that:
Verify on each workstation that no easywin.exe session is open (see
Windows->CTRL-ALT-DEL->Task manager->Applications).
Execute a test (on the server if you are on the network) by renaming easywin.exe and
easywin.mdb to easywin2.exe and easywin2.mdb.
If Windows authorizes the name change of both files, you can be sure that no one is
working in the EasyForYou program.
In the properties of the shared folder for the network, please DO NOT SHARE THIS FOLDER
until the update takes place normally.
(On the server, if you are working on the network) rename easywin2.exe and easywin2.mdb
with their original names easywin.exe and easywin.mdb.
DO NOT restart EasyForYou and update from the site on the downloading page
("update" button at the bottom of the page)
Wait for EasyForYou to restart.
In the properties of the shared folder for the network, re-authorize the sharing of the
folder.
1) On the old computer, go to menu Tools->Update software
2) Download and install the trial version of EasyForYou on the new PC. Then encode and print a fictitious invoice (if required click button CD-KEY to receive your activation number).
3) Restart the new PC, but not to start the trial version!
4) Delete the temporary files from your navigator. (very important)
5) Copy all the files from the folder EasyForYou (in general in c:\Users\USERNAME\AppData\Roaming\EasyNet\Easy For You (To locate the folder, see the menu Help->Folder)) of the old PC and paste and replace on the new PC in the folder EasyForYou (in general in c:\Users\USERNAME\AppData\Roaming\EasyNet\Easy For You (To locate the folder, see the menu Help->Folder))
!!! never install EasyForYou in the "C:\Program Files (x86)" folder or in "C:\Program Files"
(These folders are too restrictive and some features of EasyForYou are blocked)
6) On the new PC, please update EasyForYou again (Utilities menu->Update)
2) To add or modify the products quantities in your inventory (Top)
(Necessary modules: EFYSTOCK)
To add or modify the products quantities in your inventory, To modify the products quantities in your inventory, create a supplier Invoice or inventory document:
1) Click the button "Purchase" in the toolbar.
2) Click the tab "Purchase" or "Inventory".
3) Top left, type "REG" like supplier (REG = supplier Code for the inventory).
4) Click the button "+" in the toolbar to add a new document.
5) If the product exist already, in the body of the document, simply select the product with the search button and update the quantity to be returned in stock (Use negative quantities to reduce the stock).
6) If the product does not exist, type the new Code in the body of the document, then type "Enter" and allow to "add the new record". In the document input the quantity to be entered in stock.
Note 1: Outgoing stock automatically accounted for by either the sales invoices, receipt, picking ticket or cash-register.
Note 2: Inventory and products valuation can be accessed from the menu List->Products (check inventory) then press button "OK".
3) To create a backup (Top)
(Backup on Dropbox,OneDrive or Google drive -> FAQ
39)
Preferably DO NOT use the C:\Temp folder for backups (see menu File->Users).
All the data from your software are in the file c:\Users\USERNAME\AppData\Roaming\EasyNet\Easy For You (To locate the folder, see the menu Help->Folder)\easywin.mdb
To create a backup
"Easyforyou" automatically generates a daily backup in the specified folder in File>Users->Folder for your backup.
By default, the software generates your backup in the folder C:\Temp, but it is preferable to choose a shared folder on another computer as your destination folder.
The backup cycle is one week under the format easywin_X.mdb, X being the day of the week (1=Saturday). A backup is generated as well in the same place when updates of the version of your software Are executed in a file of this kind easywin_5update121719.mdb for the data and a file of this kind for the software: easywin030881142100.exe.
It is suggested that you make a copy on CDROM of the complete folder where you installed your Easy For You software from time to time. To make a free backup on a remote server (in the clouds), you can use https://drive.google.com (15 Gb of free space). Then in Easyforyou in the menu File->Users->Folder for your backup, you give the path of your local GoogleDrive (eg C:\googleDrive\Easyforyou).
This is the best way to make a backup.
Restoring a backup
If you would like to restore a backup, rename the file (generally in c:\Users\USERNAME\AppData\Roaming\EasyNet\Easy For You (To locate the folder, see the menu Help->Folder)) easywin.mbd to easywinOLD.mbd Then recopy the most recent backup in C:\Temp\easywin_X.mdb (X= # from 1 to 7 for the day of the week) into the program file (usually c:\Users\USERNAME\AppData\Roaming\EasyNet\Easy For You (To locate the folder, see the menu Help->Folder)) and rename it easywin.mdb
If the restored backup is not the same level as your latest version of the software, go to the downloading page of our Website and generate an update of the software.
If in doubt or in the event of a problem, take out a maintenance contract (see EFYHELPDESK) and contact our maintenance service or Online help. EFYHELPDESK
4)Is it possible to correct or erase a document that is closed? (Top)
(Necessary modules: EFYSTOCK,EFYPAIMENT)
In case of an error in a document, for example, to unlock a closed Invoice, you have three possibilities:
(The 2nd and 3rd possibilities are not directly available in the free version or in the the trial version)
In File->Document, choose the document in question by clicking on the Code number, then:
1) Click the menu Edit->Reopen Document (Note: after this operation, if you delete the Invoice, the products will be added back to your stock) 2)Click onto the menu Tools->Archive, archive the document in question. If you would like to reuse the document number, archive one document at a time and click onto YES to the question :Automatically recuperate the document number?
(Note: This operation will erase the document and the products will NOT be added back into your stock)
(See price list->module: EYFARC)
NOTE: This operation is irreversible! 3) Edit and correct directly in the EasyWin.MDB database with the Program Access (See Price List->module: EFYMDBACCESS)
5)How do you begin an Invoice with #X?
I have saved and sent out invoices and I would like to start with an Invoice number that follows in sequence with the last Invoice. (Top)
(Necessary modules: EFYDATA)
Easy For You bases itself on your PC's internal clock to generate the first document of the new year.
For example, December 31st, 2014, your last invoice is FT120140003453. On January 1st, 2015, Easy For You will generate the invoice FT120150000001. (Necessary module:EFYDATA)
After generating the first invoice, if you find that the new number is not convenient, you may change it with a right click on the document number
If you would like to create invoices from the preceding year during the new year, you can insert these documents and right click on the document number to change the year and number.
See also: Tools Menu> Insert document-> Delete all the lines
6)In terms of the functionality's currently present, which ones will disappear within a month (depending on the frequency of use)? (Top)
All options listed in the Price List menu of our site.
The following functions will stay active for free after 30 days demo:
-Client and supplier management
-The possibility to generate and print invoices, NC, Orders, etc - Totals listing, tax calculation, profit margins, weight etc
7)If a salesperson receives a commission on products sold, can the commission be calculated?
(Top)
(Necessary modules: EFYLIST)
In the lists, it is possible to track the documents or particular sales of a salesperson:
Proceed as follows:
- In the File->Customer, in the record, on the right-hand side, you can enter a salesperson code, for example a letter: D
- Next, in File->Document, in the Tools menu, preceding the "Sales" button, use the same code (D) as in the field Salesperson Code and you will obtain a list of documents or sales for Salesperson D.
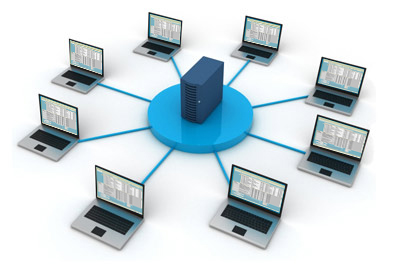
9)How do you install the software in a network ? (Top)
(Necessary modules: EFYNET2,
5...)
The installation of the software in network can be done via the classical method of simple sharing of a folder for several users (also possible on a Nas)
In this case, see here, below, point 1)
BUT! If you have Windows 10 (or higher) and some computer skills, we strongly recommend that you use the multi-session remote desktop method (without interrupting existing sessions).
It is with this system that you will get the best performance for working simultaneously with multiple people from multiple locations in EasyforYou.
And this is also how you will have the best level of security because you will not have any data that passes on the Internet and your database remains on your main computer.
Make a BACKUP and see the video and patch below for setting Windows in multi-session mode (this procedure is not our responsibility).
Following the installation of Windows multi-session video ...
How to install EasyForYou for the other user(s)
(Assuming your software is already installed in your main session, for example with the user "ADMIN" on your desktop computer)
a) In the Windows session of your main computer (that of your office), connected with the main user "ADMIN", add a new (or several) user with password (for example "Shop1, Shop2, etc ..." )
b) Give read and write permissions for new users "Shop1, 2, 3 ... etc) at the parent folder (EasyNet) where EasyWin.exe is located.
(Usually EasyForYou is in this default folder:
C:\Users\ADMIN\AppData\Roaming\EasyNet\Easy For You)
(see the exact path in the properties of your EasyForYou shortcuts)
c) On another PC, connect to the main office (desktop) remotely as a "Shop1" user, then download and install a demo version of EasyForYou in the "Shop1" session.
d) Always, on the other PC, following the installation of the demo, simply change the shortcut on the desktop:
Change the path of the shortcut :
C:\Users\Shop1\AppData\Roaming\EasyNet\Easy For You
And replace with:
C:\Users\ADMIN\AppData\Roaming\EasyNet\Easy For You
(ADMIN or the main user name of the desktop computer)
e) As soon as EasyForYou works and you are sure to see your invoices, sales orders and data of the pc of your main office, for security, delete the whole folder: C:\Users\Shop1\AppData\Roaming\EasyNet\Easy For You
f) Repeat as many times as necessary for Shop2, Shop3 etc ...
1) On the Server:
-Install the software Easy For You
-Share the folder C:\program files\EasyNET or " c:\Users\USERNAME\AppData\Roaming\EasyNet\Easy For You (To locate the folder, see the menu Help->Folder) " on the level EasyNet, authorise the Reading AND writing for the folder.
Attention, different procedure for the users from the E-commerce!
Sharing the folder at level /Eshop/Users for reading and writing for the users of the other PC.
2) On the workstation:
- Install the software "Easy For You" and at first start, fill in the company information. (in order to install the dll, ocx, and so on...)
- Then completely DELETE the folder "c:\Users\USERNAME\AppData\Roaming\EasyNet\Easy For You (To locate the folder, see the menu Help->Folder)" and the shortcut from the desktop too.
In Windows->My Computer->Network, scroll to your server \\My Server\EasyNet
- Map a network drive (Y: for example) to the server in folder \\My server\EasyNet with Windows->Explorer>Tools.
- For users of e-commerce, map the folder \\users
- For the users who have the module EFYMDBACCESS at first start, rename the extention from the file (if exist) Y:\Easy For You\EFYMDBACCESS.cok in .cod
- Search the program Y:\Easy For You\EasyWin.exe and click right to create a shortcut on the desktop of your workstation.
- For optimal use, synchronize the clocks for all your PCs on the network (date and time)
Notice 1: The demo version is designed to test the software with a maximum of 2 users.
Notice 2: For optimal use online, see the parameters in the menu File->Users->Files.
Notice 3: Important! To optimize network speed, network settings of your network adapter needs to be set to FULL DUPLEX Notice 4: In order to not have problems of writing rights in the register and in the different folders, it is preferable to give the administrator rights for all the EXE file.
The good Shortcut :
The shortcut on the desktop from the workstation to easywin.exe on the server
with a mapping to a permanently network drive (sharing on the level EasyNet) must be like this :
Z:\Easy For You\easywin.exe
NOT like this
\\.....\EasyNet\Easy For You/easwin.exe
For Dell computers to improve the performance of your software into a network:
10)Use of the printing modules of transport files (Top)
(Necessary modules: EFYEXPRESS)
1) Verify that you have the license EFYEXPRESS->File->Licenses
2) Add the transporters in the customer management, adjust the Type in Express Mail. (For example UPS)
3) Copy the files layoutEFYEXPRESS.htm and layoutEFYEXPRESSsmall.htm in the same folder as easywin.exe
4) Rename the files layoutEFYEXPRESS.htm and layoutEFYEXPRESSsmall.htm to layoutRefcustomer.htm and layoutRefcustomersmall.htm (For example: layoutUPS.htm and layoutUPSsmall.htm)
5) Enter the printer names in EFY->Tools->Parameters->General:
Printer 1*: For general EFY documents
Printer 2*: For large transporters files
Printer3*: For small transporters files
*Use the exact name in Windows->Start->Parameters->Printers
6) To print the files, click the right button on the printer icon in document management, and then choose the transporters. You can choose to print a number of transport files equal to the number of products of the active document by default.
7) Adapt the layout by modifying the HTML code with the help of an editing style Front-Page or Dreamweaver in the files layoutsRefcustomer.htm by the printers brand-name with the help of an HTML editor, or by contacting our company to adjust the page setting.
8) Fill in the values and fixed text if necessary in layoutRefcustomer.htm the same as with an HTML editor.
11)Printing pictures that illustrate the products on the documents (Top)
(Necessary modules: EFYIMGDOC,EFYDATA)
1) Verify whether you have the necessary license EFYIMGDOC->EFY->File->Licenses
2) Verify whether you have the necessary license EFYDATA->EFY->File->Licenses
3) To link an image to your products, copy your image file into the folder c:\Users\USERNAME\AppData\Roaming\EasyNet\Easy For You (To locate the folder, see the menu Help->Folder)\Images and rename the PRODUCT_Code.JPG (or GIF)
4) Activate the marked box Print images on documents in product management under the Image tab
5) Activate the marked box Print images on documents in the journal management
6) Adjust the size of the images in the menu Tools->Parameters->Products->Reduction for image printing
Warning: Send emails including photos only works with: Email PDF See alson FAQ 41
12)DECREASING PRICE SCALE for automatic calculation of product sales prices
(Top)
(Necessary modules: EFYCATEGORY,EFYPRICEPQ)
*Specification of decreasing price scale by quantities:
Create a Category in Category Management
Select your category in product management under the WEB tab (bottom right)
Mark the box decreasing price scale under the WEB tab
(In the price encoding area of the products file)
Fill in the 5 decreasing price scales by using the 1st price as the highest one.
Fill in the 4 By quantity fields, (in the price encoding area on the right).
For a value, give a QUANTITY of products from which the price should decrease from price 1 to price 2 and so forth
*Specifications of the decreasing price scale in terms of the CATEGORY! (NOTE: priority of quantity over price):
In the management of categories, create a category, choose the type Price, and add a price for a quantity of products from to
Add as many brackets of prices or margins (choose the Type price or profit margin in comparison to price 1) for quantities of to as you like.
In products management, select your category under the WEB tab (bottom right).
Note: The type Category Margin or Category Discount allow you to calculate the profit margin or discount on price 1 of the products depending on the customer category.
For example:
In customer management for customer ACBTEST in the category zone (bottom right) enter a category code of your choice; for example X.
In the management of categories, create a new category, for example CARS and choose the type Category discount, fill in the description and save. Click the + button to add a category of customers for this category of products CARS.
In the category, type X (your customer category) and 30 for the discount.
In product management, create a new product, for example CHEVROLET and in the file WEB, fill in its category with CAR.
From now on, in document management, when you make an offer or invoice for the product CHEVROLET for Mr ABCTEST, he belongs to the customer category X who have the right to a 30% discount, therefore the calculated sales price is price 1 in the products file, less the 30% discount.
Serial numbers may be encoded in sales or purchases.
To encode a product serial number, click on the body of the document to enter the edit mode in the document management (purchases and/or sales), then point the cursor of the mouse on the product Code, then click the right button.
In the popup menu, choose serial number to open the serial number encoding window.
These serial numbers can be encoded with the help of a bar code scanner that interfaces with the keyboard (parameterise a CR-LF for automatic entry) or manually.
When encoding manually, the second field allows for the entry of a series of serial numbers that follow each other.
Document search (sale or purchase) by serial number:
To conduct a search via a serial number, type manually (or with the help of a bar code scanner) the serial number you wish to find in the document management in the search field customers-suppliers at the top left WITHOUT hitting the enter or tab key. Click on the RIGHT on the search button (binoculars) of the field. A popup menu will appear. Choose serial number3
If a document with this serial number exists, it will automatically appear and a popup will indicate the product Code for the serial number.
Automatic encoding via serial numbers (ONLY FOR SALES):
In the documents grid, double-click on the existing document number in which you would like to directly add products via their serial numbers (for this to function, the serial number sought must have already been entered in one of the PURCHASE documents.)
In the Serial Number field (to be found in the toolbar, second field on the right of the send by e-mail button) enter or scan the serial number. If this serial number exists in the purchases, the product Code will be found and a line will automatically be added at the end of the current document (the serial number is also saved for this sale and may thereafter be found via a search (see above)
IMPORTANT: when you copy a document towards another document, the serial numbers automatically follow onto the new document.
For coding serial numbers, you can choose which field the cursor should
stop.
Add a line with the variable in ALL.INI file:
SerialEnterIndex = 0
Possible values:
0 = After ENTER, move the cursor to the input of the next serial number.
1 = The cursor moves to the next serial number after press ENTER after the
"Number" field.
2 = The cursor moves to the next serial number after press ENTER after the
"Packed" field.
3 = The cursor moves to the next serial number after press ENTER after the
"Expiration" field.
In product management, create a product for the invoicing of fees:
Example:
Code: FEES
Description: hourly fees
When encoding the description in the body of the document, use the following syntax:
FEES hourly fees 14h45->18h30 + eventual description
It is important to follow this hourly format: 14h45->18h30, always 2 numbers followed by a letter then followed by 2 numbers the minus sign and the greater sign, then once again 2 numbers followed by a letter followed by 2 numbers XXhXX->XXhXX
In this case, when the description is validated, the software will calculate the time elapsed between the two times given:
Example: 14h45->18h30 = 3 hours 45 minutes which calculates automatically 3, 75 units
15)Export and import the products file (MDB) (Top)
(Necessary modules: EFYPRODIMPEXP)
Export the products in a database:
In EasyForYou, go to menu Tools->Export products.
EasyForYou will generates a file with MsAccess format (C:\Temp\ArtEFY.mdb) which
contains the whole of the products present in EasyForYou.
Importation of a new database:
After having exported C:\Temp\ArtEFY.mdb, take this database as structure
sample.
You can modify the price of the products present in ArtEFY.mdb, it will be updated
in EasyForYou during the re-importing.
To add new products in EasyForYou, respect the structure of ArtEFY.mdb. Carry
out a copy of ArtEFY.mdb in then folder c:\program files \easy for you while
taking care to rename the file to import as ART.MDB.
During the restarting of "Easy For You" the new products will be imported and
the price of the existing products will be updated.
Caution: following this operation, file ART.MDB will be
automatically deleted.
Please respect these recommendations for the import of new products:
In the field CLEF (product Code) , only numbers, capital letters allowed.
No spaces allowed in this field!
Only the sign "-" (less) is accepted in the field CLEF and CLE2.
In the fields texts, do not use apostrophes or star (*) .
For the quantities, not to update field QUAN (quantities) directly but to
pass by the encoding of the purchases - > Inventory.
16)Classification of the documents to the passage of the new year (Top)
Easy For You bases itself on your PC's internal clock to generate the first document of the new year.
For example, December 31st, 2014, your last invoice is FT120140003453. On January 1st, 2015, Easy For You will generate the invoice FT120150000001. (Necessary module:EFYDATA)
After generating the first invoice, if you find that the new number is not convenient, you may change it with a right click on the document number
If you would like to create invoices from the preceding year during the new year, you can insert these documents and right click on the document number to change the year and number.
See also: Tools Menu> Insert document-> Delete all the lines
The Back-Order tab lists the OPEN orders of all customers (or suppliers for purchases)
BO=Back-Orders (orders that have not been delivered yet)
TO CREATE A PARTIAL DELIVERY :
Under the back-order tab, select the specified customer by double-clicking the corresponding line of the document.
For each product, enter the quantity to be delivered under the column "delivered" (the only column you can edit) and press the F10 key to validate the whole operation
To generate the invoice corresponding to these products and to remove them from the inventory: click Code customer and then click the right button of your mouse and choose "copy to" invoice or picking ticket
Note :
Only the lines corresponding to a fill in delivery disappear from the table after invoicing.
The corresponding order is automatically closed when the total of the products have been delivered.
Printing or the pre-visualisation shows the quantity left to deliver
18)Procedure to modify the file layoutmod.htm (Top)
(Necessary modules: EFYLAYOUT)
1) Keep a copy of your file layout.htm and make a copy to a new file: layoutmod.htm
2) Modify your file layoutmod.htm with a HTML editor
3) You may NOT at any time:
Delete the field us-Name1, us-post and us-City that must be represented
in the heading of your new document.
Delete the tag of commentary that serve as a point of Code for the
software
4) Test your new page layout by printing several different documents.
NOTE,
as long as you do not have the official EFYLAYOUT licence at your disposal,
the amounts will be replaced by the word "TEST" or 0 and the software will post a
message such as "Licence EFYLAYOUT for c:\...\layoutmod.htm is invalid"
5) If you are satisfied with your new page layout, please send us your file layoutmod.htm by attachment
for approval.
6) Once you have received an approval, you may order and pay for the module
EFYLAYOUT.
7) As soon as your payment has been received, you will receive the official
licence in an attachment via email.
19)Parameterisation and using your barcode scanner. (Top)
(Necessary modules: EFYBARCODE)
1) Parameterisation of EasyForYou.
In the menu Parameters->General->ID Barcode->Value = 120
2) Parameterisation of barcode scanner (keyboard interface).
Language for keyboard interface (group 3)
Adjust the country parameters for your keyboard
Terminator: (group 4)
No character (ENTER) after scanning but SPACE.
General Parameters (group 16)
Choose: Upper Case
Code ID Setting (group 17)
Choose the barcode types (the most used: CODE39, EAN13/UPC-A)
Function Key Emulation (group 20)
Program the beginning of the scanning (see group 6 - Preamble) of the barcode by the function key F9 or HEX 09
3) Scan the barcodes from EasyForYou.
In document management, choose your customer or supplier, then the type of document followed by the + button or F2 to add a new document. From this moment, the focus automatically passes into the bottom grid to the encoding of products and you may begin the data entry of your barcodes with your scanner.
If the barcode Code of the scanned product does not already exist in your product file, EasyForYou prompts you to create a new product form.
BCST-20 and 10 (LSIDABAR115) USB Setup
First time, do NOT connect with the cable (use only to charge the scanner)
!
Plug only the USB Dongle Bluetooth and allow the driver to install.
(Download and print the Barcode scanner Overview instructions here
https://www.easy-for-you.com/download/BCST-20/BCST-20.pdf).
The only thing you need to do is to select the type of keyboard : #8 Keyboard Language Setting
Read "Start Setting Barcode" - "Select your keyboard language"
- "Save and quit" (If not done, change your PC language as selected)
To do only if you want to group the quantities in the same line of a same
product when scanning
(Download and print the INSTRUCTION MANUAL setup instructions here
https://www.easy-for-you.com/download/BCST-20/BCST-20-advanced.pdf).
1) Page 46, scan "Enter setup" and Scan "Do not apply Enter
for suffix" and scan "Exit with Save"
2) Page 48, scan "Enter setup" and Scan "Suffix Setting"
and scan "3" and scan "2" and page 49 scan "Exit
with Save" (To Activate, check the variable in EasyForYou, menu tools->Parameters->Miscellaneous
2->ALL->Boolean->GroupQuanWhenScan)
UNITECH HT580 (LSHT580) USB Setup
(Download full instructions here https://www.easy-for-you.com/download/HT580/HT580-readme.pdf).
1- Create a folder c:\temp\DriverHT580
2- Download the driver from the site and unzip to a tempory folder c:\temp\DriverHT580
(DO NOT INSTALL THE DRIVER) 3- Connect the scanner before and when
windows detect the new hardware, give the driver location map c:\temp\DriverHT580
to found the driver
Or download the PDF with the full procedure to install the drivers :
Unitec
HT580 Website
or Windows
VISTA+W7 or 8 Driver Windows
XP Driver
Download Tools.zip
Utility.
Open the Tools.zip, navigate to the folder Tools.zip\Tools\12Comm\*.*
and copy all the 3 files to c:\....\Easy For You\import
Delete the two files WorkingINI.txt AND README Vxxxx.TXT
Start 12com.exe and wait a few seconds and STOP 12com.exe
The 12com.exe have created a new file 12Comm.ini
Edit the file 12Comm.ini with the Windows notepad and set :
COMPort settings = X,38400,8,1,0 (X= the com port from the UNITECH
scanner available in Windows->System->Hardware->Peripherals->Ports COM...) File(s) on PC = HT580.TXT
Save the file 12com.ini
Start again 12com.exe and scan a few barcodes, on the scanner, select
tranfer to the computer, start EasyForYou and Press Shift-F2 keys With Windows XP or if 12comm.exe give you a error message, go to Microsoft
web site https://www.microsoft.com/downloads search and install .NET Framework
Other scanners :
BTS 4500 & BT-650 (LSIDABAR115) Default
Setup for BTS software ( to UNZIP and copy in c:\....\easy for you and
to load in BT scanner software, start the scanner software and load this
file and push the button Upload file)
OPTICON (obsolete) (LSIAOPT-OPN)
USB Setup (to run before connecting the scanner) OPTICONUtility
( to copy in c:\....\easy for you\import )
20)Several precautions to update successfully when using EasyForYou (on the network) (Top)
(Necessary modules: EFYUPDATE)
Before update, please STOP first all other sessions from the Application Easy For You in the Windows Task Manager.
Procedure (single user)
If possible, make a backup in the menu Tools-> Backup ...
Shut down your computer and restart it and above all: do NOT start EasyForYou !
Download and run the update by clicking the button UPDATE
Wait until the update if finish and re-start EasyForYou.
Check the licenses, click File-> Licenses-> To download...GO ...
In the Menu Tools->Update software, check if the date of license is OK-> 20??, Otherwise click the menu Tools-> Calculation of the price of your update order the license.
In network you must insure at 100% that:
Verify on each workstation that no easywin.exe session is open (see
Windows->CTRL-ALT-DEL->Task manager->Applications).
Execute a test (on the server if you are on the network) by renaming easywin.exe and
easywin.mdb to easywin2.exe and easywin2.mdb.
If Windows authorizes the name change of both files, you can be sure that no one is
working in the EasyForYou program.
In the properties of the shared folder for the network, please DO NOT SHARE THIS FOLDER
until the update takes place normally.
(On the server, if you are working on the network) rename easywin2.exe and easywin2.mdb
with their original names easywin.exe and easywin.mdb.
DO NOT restart EasyForYou and update from the site on the downloading page
("update" button at the bottom of the page)
Wait for EasyForYou to restart.
In the properties of the shared folder for the network, re-authorize the sharing of the
folder.
* 5 steps for NAS server mapped drive update OR in case the update is not successful on your computer with the other procedures :
1) Check if Make sure you have the latest update:
(see in the title bar of your EasyForYou software): Vers. YY.MM.xxx
Or in case YY and MM are the current year and month, you probably don't need to do an update (unless there is a bug)
Otherwise, proceed with the update as follows:
2) Launch EasyForYou and create a backup from the Utilities menu.
3) Check where the EasyForYou program is located, In EasyForYou, click the Help menu->Folders->EasyForYou
*** !!! Remember the name of this folder !!! for next step
4) Stop EasyForYou on all computers! And shut down all computers where you use EasyForYou.
Restart only ONE computer where EasyForYou is installed.
Warning!!! DO NOT restart Easyforyou on this computer after the computer has restarted!
unzip the file and copy all extracted files to the EasyForYou folder ***.
Replace existing files.
If you have a multi-user system, you should only update one of the workstations.
Restart Easyforyou and check if the version number is correct.
(In case of multi-user network version, If you restart EasyForYou, on all other computers, the version number must have been adapted)
* If you have problems after printing PDF to reset your original
windows default printer as default printer :
Open your registry with regedit
Go to this registry key
HKEY_CURRENT_USER\Software\VB and VBA Program Settings\EFY\Settings
Add a new string value :
DefaultPrinter
And copy paste the name of your default printer as value
* If you have problems to print some list or list previeuw
:
Try to run the software easywin.exe as Administrator (right-click)
If work not then :
Make a backup !!!
In the c:\....\EasyNet\Easy For You\all.ini , edit with notepad and set
the line Transactions=N (or add this line if not present)
DONT FORGET THIS STEP ! : Rename the folder c:\....\EasyNet\Easy For You
AS c:\....\EasyNet\Easy For You-OK
Stop and restart your computer, but before you stop disable your antivirus
for a few minuts.
Download and reinstall the demoversion from us website.
(this will reinstall all the needed windows components for Easyforyou)
Rename the folder c:\....\EasyNet\Easy For You as c:\....\EasyNet\Easy For
You-DEMO
Rename the folder c:\....\EasyNet\Easy For You-OK as c:\....\EasyNet\Easy
For You
To Make a test of your list start c:\....\EasyNet\Easy For You\easywin.exe
If this work not try to change the compatibility for c:\....\EasyNet\Easy
For You\easywin.exe
If this work not try to change users and set to admin for c:\....\EasyNet\Easy
For You\easywin.exe
21)Procedure to uninstall completely EasyForYou (Top)
Uninstalling EasyForYou in the classical manner :
Windows->Start button->Parameters->Settings->Add/Delete program->Easy For You->Delete.
fill inly delete the folder EasyForYou in c:\Users\USERNAME\AppData\Roaming\EasyNet\Easy For You (To locate the folder, see the menu Help->Folder).
23)Generate the Invoice Reminders (Top) (Necessary modules: EFYREMINDER)
Parameterize
See Menu->Tools->Parameters->Accounting.
Advanced management can be activated if you click the checkbox "Activate the advanced
invoice reminder system
Three templates of reminders are available.
They are intended automatically to generate remind letters via the
Menu Tools->Generate the invoice reminders
OR via
Menu File->Users->Activate the automatic invoice reminder system.
Reminders are generated, with the first starting and this once per day. The genarator
print the remind letters to be sent for the unpaid invoices.
The remind letters of level 1 is generated automatically under the following conditions
(according to the language of the customer):
1) the invoice is not paid (the type of payment is always on "To be Paid")
2) In the management of the customers, the category of invoice reminder is NOT
on "No Invoice Reminder"
3) the due date of the invoice + the number of days indicated in the field "Level
1" (15 days by default) is exceeded.
The remind letters of level 2 is generated automatically under the following conditions:
1) Same as level 1
2) Same as level 1
3) the date of the first reminder (visible on the bottom of File->document)
+ the number of days indicated in the field "Level 2" (15 days by default) is
exceeded.
The remind letters of level 3 (formal warnings) is generated according to the
same principle as the remind letters of level 2 by holding account of the level
3.
Modification of the models of letters.
In the grid of buttons (3 levels and 6 languages) for editing the remind letters,
it is possible to edit the HTML templates while clicking on the corresponding
button.
Please check beforehand if A text HTML text editor is parameterized by default
in your Internet Explorer in your menu Tools->Internet Otions->Programs (By default,
Front-Page)
If layoutRxLL.htm (x=reminder level, LL=Language of the reminder) is not present
in then folder of EasyForYou, please download the files on https://www.easy-for-you.com/download/layoutRxLL.ZIP
By Checking the boxes "From level", you can parameterize dunning charges Or interest
rate which will be calculated starting from the due date and will be added in
the reminders.
The default category of invoice reminder will be taken again automatically when
adding of a new customer in EasyForYou.
Various functionalities related to the use of the reminders:
Since the management of the documents (only available in the invoices tab): Click
the "Not Paid" button, then click the right button of the mouse to filter and
to show only the invoices having a reminder of level X or to post only the generated
reminders this day.
A right click on the number of a document show the contextual menu, choose "Invoice
reminder" and the level wished to pass the invoice.
A right click on the printer button for printing a reminder letter (Same for the
email and preview buttons).
CAUTION: Never open the database Easywin.mdb directly MSACCESS
Record your licence EFYMDBACCESS and check the presence of the file Accesstomdb.txt
If you do not have a network version of EasyForYou (EFYNET...), the database will
be open exclusively, consequently to carry out the following operations STOP EasyForYou.
In the folder of the database easywin.mdb (in theory c:\Users\USERNAME\AppData\Roaming\EasyNet\Easy For You (To locate the folder, see the menu Help->Folder)),
to create a new blanc database with Ms Access which you name EasyWin_the_name_of_your_company.MDB.
In the new database, click the "New" button and choose "link, then select c:\program
files\easyforyou\easywin.mdb finally click on the button "Link" to attach the
tables.
Enter your password which is in Accesstomdb.txt.
Choose and select the tables, so your database is ready.
In this way, at the time of the updates of EasyForYou your personal MsAccess database
will not be affected.
25)Instructions for sending your file easywin.mdb (Top)
1) Be sure to have a compression software (for example : https://www.winzip.com https://www.rarlab.com
(the free version is enough)
2) In Windows, click the RIGHT button of your mouse on the "Start" button, a contextual menu will appear.
3) In this contextual menu, click on Explorer"
4) In the left part of the Explorer, click on Work-Station" - >Disk (C:)- > click the folder c:\Users\USERNAME\AppData\Roaming\EasyNet\Easy For You (To locate the folder, see the menu Help->Folder) as in the picture.
5) In the right window, click the RIGHT mouse button on the file easywin.mdb (*)
- (*) If you do not see the extensions in your exploreer, click on menu Vieuw->Details.
- (*) If you still do not see the extensions, in your Explorer click the Tools menu->Folder Options->Vieuw->files and folders and UNcheck Hide file extentions for known file types, then click the Apply" button
6) Right-Click on easywin.mdb, and in the contextual menu, choose Compress and E-mail.
26)Instructions to receive your file easywin.mdb
(Top)
1) Be sure to have a compression software (for example : https://www.winzip.com https://www.rarlab.com (the free version is enough)
2) In Windows, click the RIGHT button of your mouse on the "Start" button, a contextual menu will appear.
3) In this contextual menu, click on Explorer"
4) In the left part of the Explorer, click on Work-Station" - >Disk (C:)- > click the folder c:\Users\USERNAME\AppData\Roaming\EasyNet\Easy For You (To locate the folder, see the menu Help->Folder) as in the picture.
5) In the right window, click the RIGHT mouse button on the file easywin.mdb (*)
- (*) If you do not see the extensions in your exploreer, click on menu Vieuw->Details.
- (*) If you still do not see the extensions, in your Explorer click the Tools menu->Folder Options->Vieuw->files and folders and UNcheck Hide file extentions for known file types, then click the Apply" button
6) Right-Click on easywin.mdb, and choose contextal menu "Rename" and rename the file towards easywin-old.mdb (if easywin-old.mdb already exists, please beforehand erase it).
7) In your E-Mail software, double click on the received attachment (the file easywin.zip).
8) When Winzip is Open, select ALL the files contained in the ZIP.
9) In WinZip, click the button Exctract To and to choose the usual folder of your Easyforyou software (in general c:\Users\USERNAME\AppData\Roaming\EasyNet\Easy For You (To locate the folder, see the menu Help->Folder)).
10) Unzip and overwrite the existing files by ALL those contained in ZIP file.
INI Files are simple text files and can be created with the notepad of Windows and be saved in the file where is installed your software (in general c:\Users\USERNAME\AppData\Roaming\EasyNet\Easy For You (To locate the folder, see the menu Help->Folder))
These files are intended to activate certain specific parameter settings.
The name of a file INI is consisted of the Code of the left 3 caracters of the document number (Type of document) for which it must act.
For example: for the invoices it will be FT1.INI
The contents of file INI must end in word END
Click here to download an example of INI file (or use ALL.INI if the parameter must be able for all the documents)
Available variables and their function:
NumberLineBody=0 (number of lines in the body of the document) NumberLineFeed=0 (number of lines in the foot of the document) NotPrintToPay=Y (does not print the mention `to pay' on the document) Jo-Message-EN=Message (Long Message for the foot of the documents. These messages must be written in only one line but can contain HTML tags, for example to pass the text to the line. The comma must be replaced by and for the Semicolon and for the apostrophe) Discount-Message-EN=Message... in the event of use of discount - product ESC (same for NL. .EN. .IT. .DE...ES PT ) DontUpdateCreditWhenImport=Y (does not affect the balance of the customer in the event of importation of invoices by the system of importation of text files) SequenceToOpenCashRegister=65 (Character for control sequence of opening of the cash register) PrintPriceWeight=Y (Print the price by kilo on the documents) OnlyCreateTableOnPrintLabels=Y (Creates a table LAB001 in easywin.mdb containing the data for the impression of bar-codes labels during the impression of a document) PaymentRefNumber=999 (Code in the event of insertion link for payment by credit card) CopyDocumentIn=copydoc (name of the folder (directory) in which you wish to preserve a copy of the original printed documents - HTML) PrintPaidOnFeedDocument=FF0000 (impression in red of the text `Paid' on the paid invoices.) LoginPaypal=info@yourloginPaypal.com (login paypal from Link for secure payment by credit card on the document) PrintTL=Y (Print the number of lines on the foot of the document) Shift-F7=T (Shift-F7 save the payement type 'T' and print the document) SecondTaxField=DEPOSIT (replace the management of REPROBEL taxes by a management of the guarantees for the consigned products. Also possible for BEBAT, AUVIBEL) WaitCoef=0.5 (Multiplying coefficient 2 - or divider 0.5 for the function wait function - ALL.ini) NoQuestionForSerial=Y (No question if encoding of the number of serials # <> of the quantity - ALL.ini) PrintCustomerEAN13Barcode=Y (Print the customer code with a EAN13 barcode on the documents) PrintDocumentEAN13Barcode=Y (Print the Document number with a EAN13 barcode on the documents) JouPopup=BC1 FT1 (or Y = ALL : name of the document type /POP:..type this code in the customer additionnal field and the Text that must be showed in a popup when you encode a new document PutUserInRefPayment=Y (Adding automatically the vendor code in the payment reference when encoding the type of payment in a document) ProductsMarginsfixed=Y (If Yes, in File->Products the recalculation of the 5 sales prices appends in the event of a change in costprice regarding the 5 Margins) SecondTaxField=DEPOSIT or EXISES (replaces REPROBEL management fees by managing deposits for returnable or excise duties for the sale of alcohol products) TakeUserLanguageToPrint=Y (When printing a document, the choice of language is based on the user's language) ShortCut1=%IA (Example = ALT-IA-I. Alt-I for insert, ALT-A for Attachment - For the ALT use the character % (Create a shortcut to attach a document in your e-mails. Create the shortcut with the first letter of the pressed key ( if the ALT key is pressed, use the character percent (%). Consider uppercase and lowercase)
Available in:
- Sending a email with invoice in PDF format as attachment (FAQ 36)
- If you specify a destination type document in case of sending data as attachment in the menu File->Documents settings.
END
Additional variables for the *.ini files
Jx-Message-(Customer Language)-(My VARIABLE in additional fields Customer)=My
specific text (Put your variable and specific text in FT1.ini for the
invoices, in BC1.ini for the orders... example for : Jx-Message-EN-XXX=Blablabla
put /BDP:XXX/ in the additional fields Customer tx-Adre=Y (put the text "Adress" above the name of the customer/suplier
when printing a document) PathForExcelFiles=c:\tmp... (in All.ini select a specific folder
for the export off excell files)
Note: If you like to change the c:\temp path, change into the registry from
all the CLIENTs computers : HKEY_CURRENT_USER\Software\VB and VBA Program
Settings\EFY\Settings\TempPath ListDocReplaceTELE=ADR2 (in menu List->Documents replace the column
"Phone" with another variable from the "CLI001" customer table) ListDocReplaceMAIL=NOM2 (in menu List->Documents replace the column
"E-Mail" with another variable from the "CLI001" customer table) ReplaceLanguage=NLCN (for all.ini -> replace all the language NL
'dutch' with CN 'chinese' -> in case you put (translate yourself) the chinese
text in colum NL from the Access file easytext.mdb) GetDeliveryAdressIn=BC1*FT1...(for all.ini -> When printing a
document, show the promt to select the adress or delivery adress if a delivery
adress exist DO NOT use the semicolum as separator, only the *) AddDeliveryAdressIn=BC1 or FT1...etc NEW(for all.ini -> When create a
document, if a delivery adress exist then add automatically this delivery adress in the beginning of the body of your document) PrintSerialReport=Y In this case, do not print serial numbers on the document (invoice, delivery notes), but print a separate report for all serial numbers regarding the document (invoice). NoTransactions=Y (Stop the sql transactions process when updating
database - no BeginTrans, CommitTrans, RollbackTrans possibility) NobackupWhenRegroupDoc = Y (Regroup faster but not safe. Do it at
your risk) PrintIntrastat=Y (print intrastat codes from product form in the
export documents (use this in BC1.ini, FTA.ini...) SortByKey=CLE3 (print documents sorted by CODE 3 (use this in ALL.ini
OR BC1.ini OR FTA.ini...) - you can also use variable CLE2 for "CODE
2" or Localisation for "Location" SortBOBy=CLE3 (Sort Back-Order (BO1,BO2) documents on screen by CODE
3 (use this in ALL.ini) - you can also use variable CLE2 for "CODE
2" or Localisation for "Location" DontPrintCode=Y Do not print the product code on the documents (use
this in BC1.ini, FTA.ini...). GroupQuanWhenScan=Y When you get a products with Barcode scanner
in a document, group the quantities for the same products in the same line DoNotUpdatePackages=Y When you change the purchase prices from a
product do not recalculate the packages (increase the speed) SpecialEscompte=8 When getting the product ESC (discount % if payd
before 8 days), do not change the total documents on the food (put
the text in the body of document instead of putting the text on the foot) TextColPrice=Special text When printing a document, in the layout,
you can replace the original text "Price" with your specific text
- for example replace "Price" with "Unit prices" (use
this in BC1.ini, FTA.ini...). PrintTwoUnitPrices=Y When printing a document, replace the price
with Price level1 + customer price (gross prices and net prices) the colum
"Price" - (use this in BC1.ini, FTA.ini...). CheckStop=Y Whit this parameter, the program easywin.exe check the
stop.txt file in the network every 2 seconds and stop run all users if stop.txt
is present DocformatNR=2011-12/9999 Whit this parameter, you can format manually
a specific document number (write the number (as example "2011-12")
you want before the "/", and the 9999 will be replaced with the
real document number) OkLLSales=Y By default, Width and Length work only for purchases
in the documents, with this option Width and Length work also for sales PrintCashOnRegister=Y Print also the cash for each Users on the menu
List Payments DocformatNR=[mm]
Add the month into the simplified document number ( 2012-01/1 ) GotoQuan=Y After a product selection
in the document, focus go to the field Quantity PrintPaymentDetails=Y After update the document,
the details from all the paiments done are added as text in the body of
the document OkToMatchByAmount=Y (in All.ini for module: EFYCODA) If OkToMatchByAmount=Y and the payment reference does not correspond to any invoice, the software searches for an not paid invoice which corresponds to the amount of the coda. If ONLY ONE unpaid invoice is found and corresponds to this SINGLE amount, it will be cleared ToleranceMatching=2 (in All.ini for module: EFYCODA) It is better to set ToleranceMatching=1 or 2 (corresponds to a small difference of 2 more or less eurocents). For example an invoice with amount of 1499.15 will not be cleared if the payment corresponds to 1499.1499 (this happens regularly in the coda files) or vice versa, for example an invoice with an amount of 1499.1499 (when printed the invoice is 1499.15 but for the research it will be 1499.1499 and will not be settled if the payment corresponds to 1499.15) MinimumKiloBytesPDF=200 Check and set the minimum
KiloBytes size of your *.pdf documents in the EasyNet/Easy For You/PDFdocuments
folder. With this, the PDFPrinter will wait until the end of the print Translations= https://www.bing.com/translator/ With this parameter,
EasyForYou will activate a button
in your menu Files-> Products to automatically
perform a web translation of the product
description in commonly used languagesused
languages
Exporting text files containing the data to (re-)generate
documents
- Export possible in menu Tools->Regroup Documents or with a RIGTH->Click
on the print button, select Export)
- To re-import a generated document, copy the text ctp8****file.txt in the
folder Easynet\Easy For You\import and press shift-f2
FolderForCrossFiles=C:\Users\Test\importWith
this parameter, you can specify a folder for exporting a document in text
format (this, for example to send it by email or re-import it into another
EasyForYou from another company) CustomerForCrossFiles=MYCUSTOMERWith
this parameter, you can specify a specific customer (or supplier) when exporting
a document in text format (this, for example to send it by email or re-import
it into another EasyForYou from another company) TypeDocForCrossFiles=INVWith this parameter,
you can specify a type of the new document generated when exporting a document
in text format (this, for example to send it by email or re-import it into
another EasyForYou from another company)
DocName-X-FR = Printed name of the document in French in case the vendor
code is X
Used to change the name of a document according to the vendor code.
(for example to change "Purchase Order" to "Returned Products")
In the example BC1.INI (BC1 = Order, but it also works for all other documents
BC1, FT1 etc ...)
DocName-X-FR = Printed name of the document in French in case the vendor
code is X
DocName-X-EN = Printed name of the document in English in case the vendor
code is X
Same logic for other languages ... (you can also put another name according
to the letters)
DocName-Z-NL = Printed name of the document in Dutch in case the vendor
code is Z
SetPaidButton=ON (or OFF) Set Payment button in menu selection from
the lists and groupdoc. SetNotPaidButton=ON (or OFF) Set Payment button in menu selection
from the lists and groupdoc. SetOpenButton=ON (or OFF) Set Payment button in menu selection from
the lists and groupdoc. SetClosedButton=ON (or OFF) Set Payment button in menu selection
from the lists and groupdoc.
Parameters when sending documents by email FileForAttachmentDoc (*filename.pdf for pdf file attachment with
terms and conditions) FileForTextSubjectMail (specific text for the subject) FileForTextBodyMail (*filename.htm for specific text for the body) NB: In case of multi-language, you can write FileForTextBodyMail(Language code 2 letters) or FileForTextSubjectMail(Language) txtServer2=smpt.WithAnotherSMTP.com (Add this only in ALL.ini, If
you have more than one SMTP connection - You can use txtServer2,txtServer3,4...
until 10) UrlSoc (Url to your logo file on your website to include in the mails:
for example UrlSoc=https://www.baron.be/images/logosmall.gif ) ProductsGenerator=Y In Menu Files->Products (Key F8) Automatically
generates a series of new products regarding the files Size.txt and Colors.txt
* filemane.pdf or filename.htm can be filenameXX.pdf (XX can be replaced
with all of the 7 languages)
ALL.ini file only Gettext Replace or translate a text in the program : AAA=old- (EN) NOT FOUND text- (EN) NOT FOUND
BBB=your- (EN) NOT FOUND translation- (EN) NOT FOUND Add a line in the ALL.ini file with GettextAAA=BBB
and save.
Specific for printing labels
specialLogoLabel=MyLabel.jpg (select a special picture to print on
your label) SecondLogoLabelsProductCode=X (if the name of the picture printed
on label is MyLabel.jpg, the picture XMyLabel.jpg is selected and printed
only if the product code begin with X) GetSpecialLabelFileName=FTA (Load special label parameters in file
easylabel-docFTA.ini when comming from menu List->Print Labels Barcodes) specialQuantityLabel=4 (set a specific number of colums when printing
labels on A4 paper format OR if you want only a specific quantity of label
for each line from your document) nTypeLayout=1 (select a specific type of paper size when printing
labels use this in BC1.ini, FTA.ini...) NbrCopyDoc=X (X is the default number of copies for a document in
BC1.ini, FTA.ini...) sortlabelby=MVT001.CLEA as ToSort (To sort the labels by a specific
field) LabelPrinter=ThePrinterForYourLabels (To print labels on a specific
printer)
English note : Reorg.txt
If the file reorg.txt is present in c:\Users\USERNAME\AppData\Roaming\EasyNet\Easy For You (To locate the folder, see the menu Help->Folder)
and contain one of the following words : autorun = Start a automatically a full reorganisation from menu Tools->Reorganisation autorunsetstocktopzero = Same as autorun and reset all product stock
quantities to ZERO deletealldoc = Same as autorun and delete definitely all documents
(and movements) from your database and reset all products stock quantities
to ZERO. deleteallprod = Same as autorun and delete definitely all products
from your database. deleteallcust = Same as autorun and delete definitely all customers
from your database. deleteallcat = Same as autorun and delete definitely all categories
from your database. deleteallserial = Same as autorun and delete definitely all serial
numbers from your database. deletedeleted = Same as autorun and delete definitely all deleted
records from your database
NOTE: In multi users sessions or if the main user have password, the Reorg.txt
file must contain the Admin password at the second line !
Parameters to send with the easywin.exe "myparameter" (In order
to use with the Windows Task scheduler)
AUTOCHECK or SHIFT-F2 Start Easyforyou and check with the
shift-F2 command to import the orders or result from scanner
AUTOCHECKLISTPRODTOORDER Start Easyforyou and show the lines of the
products to order AUTOCHECKGROUPDOC Start Easyforyou and group the open Orders to invoices
(to use with the SetPaidButton variable AUTOPRINTINVENTORY Start Easyforyou and print the inventory (use
with the Windows scheduler to print every year the inventory) AUTOCHECKDOCTOSENDBYPDF Start Easyforyou and send all open invoices
by PDF AUTOCHECKEXPORTECOMMERCE Start Easyforyou and export a file for your
e-commerce : easywin-ecommerce.mdb
1) Copy-Paste your data into the Excel files and save the Excel file in the same folder as easywin.exe and CLOSE the EXCEL software
2) Start you your software Easyforyou: click the Tools menu Tools->Import data from Excel.
- The non-existent products, customers or suppliers will be automatically added
in your data base from EasyForYou.
- For each importation, if customers, suppliers or products already exist, the data (price, descriptions etc ) will be updated.
To export your customers, suppliers or products:
1) start EasyForYou in menu Tools->Import-Export data from Excel.
2) For the export to Excel files, click the button Export.
3) The generated file in the folder c:\Users\USERNAME\AppData\Roaming\EasyNet\Easy For You (To locate the folder, see the menu Help->Folder) is the same than for the import, only the name is changed to customers-en-export.xls and produts-en-export.xls for your products.
Note: A string can be used as a parameter to automatically start the import or export:
Parameter 1 = importexel
Parameter 2 = language (FR, NL, EN, ES, DE, IT, PT)
Parameter 3 = file type (C = Customers, P= Products, A = categories)
Parameter 4 = Import or export (IMPORT, EXPORT)
Format: 1 * 2 * 3 * 4 *
Example:
"C:\Program Files\Easy For You\ImportExcel.exe" importexel*EN*C*IMPORT*
Activate the management of the special taxes or another supplement systematically dependent on certain products.
You can add several products ECOTAX1, ECOTAX2, ECOTAX3 (exactly like a product, in so far as its Code starts with ECOTAX or REPROBEL, it will be selectable in each products produced.
Note: Taxes ECOTAX, RECUPEL REPROBEL, BEBAT, AUVIBEL can be or not calculated according to a percentage of the price on which the tax is dependent.
Import lines in a document (inventory movements) with a text file.
Necessary packages : EFYBARCODE ou EFYESHOP
Important : The customers (or supliers) codes present in the text files must
exist in the customer file from Easyforyou. (same for the products) .
In case of non exist, when importing the file, Easyforyou take the code REG
and put the 'not found' code in square brackets before the product description.
Structure of the FileName : For example : YOURREFERENCE-BC1.txt (or .csv)
All the caracters (maximum 30 numbers or letters) before the - (minus caracter)
are allowed and wil be taken as reference for the payment in the generated document
(YOURREFERENCE like in the example from the next line) .
The 3 last caracters, define the type of document generated (BC1 for
the example in the next line) in which the document will be generated.
So, for the example, Easyforyou will generate a customer with number -> BC12010000000X...
Structure from the file.
(semicolon delimited)
Click
here to download the example YOURREFERENCE-BC1.txt
With the Notepad from Windows, create and save this text in your folder " import
" if not exist, to create in folder c:\Users\USERNAME\AppData\Roaming\EasyNet\Easy For You (To locate the folder, see the menu Help->Folder)\import
1) DATE from the document
2) TIME from the document
3) CLIENT = Customer Code in Easyforyou
4) USER = User name (login Easyforyou)
5) PRODUCT = Product Code in Easyforyou
6) QUANTITY = Quantity (Decimal = DOT, numbers to format with 2 decimals, no zero)
7) PRICE = Unit proce (Decimal = DOT, numbers to format with 2 decimals, no zero)
8) DESCRIPTION = Description (50 caracters, no apostrophe and no quotation mark
)
9) DISCOUNT = Discount (Decimal = DOT, numbers to format
with 2 decimals)
The file can contain more than one customer, so you cn use one file to generate
more than one document.
In the example, there is two different customers, the first AAABCTEST and for
the 4 last lines the customer GOOD-CAR-HAMBU.
This will generate tree orders BC12010 .1,BC12010 .2 and BC12010 .3
You can also put remark's in the lines (see the example " Your remark ")
You can also put payments in the lines (see the example "PAYMENT")
A = Paypal
K = Credit card
B = Bank
Insert the customer data with a SQL request:
Create a customer code and use this code as filename (Example: TESTCUSTOMER)
Only the letters, numbers and the minus sign are accepted.
Max length = 15
Import in two stages :
1) Insert the record (INSERT request)
Example with a text file : Download the example (TESTCUSTOMER.sql)
2) Update data (UPDATE request)
Example with a text file : Download the example (TESTCUSTOMER.squ)
To copy in your folder " import "
Importation : Start Easyforyou and press Shift-F2
After import, the file Extention is renamed in " .OK "
(For the example YOURREFERENCE-BC1.ok)
Specific From Version 10.12.793 (sorry only English for this informations):
- When you start easywin.exe, you can automatically execute the import shortcut
"shift-f2".
For this, create a C:\.....\Easy for you\import\shift-f2.txt empty file.
(This file is automatically deleted each time the import is done)
- If you need the products information for a external e-commerce in TXT
or CSV format. Call the ExportCSV.exe from the Windows
sheduller to export automatically the
Products.csv or products.txt
(Use the products.ini generated at the first start from ExportCSV.exe to
specify the fields you want to export and the file extension you want -
CSV or TXT)
- You can create customers.SQL or customers.SQU files if you want to import
or update more than one customer in one single file.
- You can call the the easyforyouftp.exe as a shedulled task from a batch
to upload your products informations or download automatically your order
and new customers files from you external e-commerce.
To circumvent the many BUG of Copy-Paste of Windows, erase beforehand
the temporary files of the Internet Explorer (In the Internet Options).
And especially, decontaminate the function UAC (User Account Control). Warning: make a backup from all your files BEFORE decontaminating UAC
Open up Control Panel, and type in user account into the search box..
You'll see the link for "Turn User Account Control (UAC) on or off". Click it.
Uncheck the box "Use User Account (UAC) to help..." , and reboot your
computer.
You should be done with obnoxious prompts!
Note: Disabling UAC will lead to a less secure system, so be warned.
32)Products allocations management for suplier back-order (Top)
(Necessary modules: EFYATTRIB)
EasyForYou manage the customer stock allocation for the supplier ordered products
The module Allocation management carries out the following operations automatically:
As of reception of the goods coming from your supplier, during the encoding of the quantity, EasyForYou show the list of customers having ordered specimens of the delivered product.
At This level, it is possible for you to allot the quantities for each open customer order.
After validation, EasyForYou automatically generates the deliveries notes or invoices (at your choice) and automatically encloses the entirely delivered orders.
Allows, in addition to the printing of a document, to print on a third printer, labels intended for the various products present on the document
To print labels relating to the documents :
1) Click the document tab for which you want to print labels
2) Click the Menu Files->Documents settingss, on the rigth click "Print labels"
3) If the labels must be printed on a specific printer, you can specify it in the menu : Tools->Parameters->Printing->Printer 3
4) If you do not want labels for specific products, in the menu File->Products->Categories,
joint the product to a specific category and in the menu File->Categories->Select the product categories and uncheck "Print Labels"
34)Printing Error res://ieframe.dll/preview.js(Top)
when printing after install IE8
1) Stop EFY
2) Be sure to be logged as Administrator
3) In Windows Start->Control Panel->Users->Turn UAC (user account
control) OFF (disable UAC), restart your computer
4) In Windows Start->Program->Accessories->Command prompt (DOS)
-> Right click and start as ADMINISTRATOR
5) In the DOS prompt enter the command: regsvr32 ole32.dll (press
ENTER)
6) In the DOS prompt enter the command: regsvr32 ieframe.dll (press
ENTER)
7) restart EFY and try to print
8) Other solution : Sometime the internet explorer work to slow (because
of anti-virus or other...), the communication between easyforyou and the
Internet explorer is to fast or to slow. In the root folder from EFY, near
the easywin.exe, You create a text file mamed ALL.INI (see Possible parameter settings by INI Files) and include the variable WaitCoef=3, restart
EFY and test the printing, if that work not try with WaitCoef=4 ,
and so one, each time restart easyforyou.
9) If this work not, (look here -> https://support.microsoft.com/kb/957700)
or in Windows, go to Start->Control pannel -> Software- and uninstall
IE8 Beta
10) If this work not try to click here
To use the send PDF button (right-Click on the Email button), you have first to setup this function in Windows 10, please follow this procedure:
1) Click menu Help->Folder->EasyForYou Ok
In the open folder ...\EasyForYou,search and right-Click AddPrinter.exe (Run as administrator)
QUIT the software EasyForYou !
2) Navigate to Windows Start menu.
Click :Settings
Click :Devices in the Settings dialog.
Make sure you are in the section :Printers & scanners
Disable the setting :Let Windows manage my default printer by setting it to Off.
Click on your main printer and select :Set as default.
3) Restart EasyForYou and in menu Tools->Parameters->General Check E-mail With SMTP and clicl the button Setup E-Mail SMTP
Input your SMTP server in the field
Copy your email adress also in Bcc Email, In this way, you will receive a copy yourself to put un your :Send Email folder
If you need to send :Terms of Sales. With your unvoices (appends only with invoices),
you can make a PDF document like TermsOfSales.pdf and copy this file to the folder ...\EasyForYou
Put TermsOfSales.pdf in the filed :Attachment
Click the Send Test Button to check if the SMTP works fine.
If the Send Test lasts too long, then you have to setup the SMTP options in the frame :Options
Parameters when sending documents by email to put in the ini file (like
FT1.INI for invoices) FileForAttachmentDoc (*filename.pdf for pdf file attachment with
terms and conditions) FileForTextSubjectMail (specific text for the subject) FileForTextBodyMail (*filename.htm for specific text for the body)
Example in FT1.IN to have aspecific subject and body
(in the file mailSubject.txt put your specifict
text to send with the invoices)
(in the file mailBody.txt put your specifict
text to send with the invoices)
You can work with multiple language
In the case create a file for each language like :
(Some computers, being faster or slowed down by low-quality antivirus programs, may experience timing issues when printing PDF files.)
These variables, which can be added or have their values modified in the ALL.ini configuration file, allow for fine-tuning adjustments.
Example of these variables with their default values:
MinimumKiloBytesPDF=150 * Average weight in kilobytes of your printed PDF files. This value can be adjusted as it varies depending on the type and weight of your logo printed in the document. WaitPDF=1 * Number of seconds required for the document to be visible to the Windows Explorer in the c:\temp folder. MaxWaitPDF=5 * Number of seconds required for the document to be copied and visible to the Windows Explorer in the X:\YourDrive or NAS server\EasyNet\Easy For You\PDFdocuments folder.
* Please remove the explanatory comments in the all.ini file.
You can easily automate daily or weekely the sending of PDF invoices
to your all customers !
In the windows task planner, add a task with the command:
"C:\....\EasyNet\Easy For You\easywin.exe" "AUTOCHECKDOCTOSENDBYPDF"
You can also make so that emails sent in PDF are automatically accompanied by a few attached files.
Just put the files to be sent in the '.../Attachments/Type document...' folder
For example:
In the .../Attachments/OP1/... folder
- Photos or PDF files that illustrate your company (be careful with the size of the photos, if the files are too large, it will not work or emails will not reach your customers)
- In the .../Attachments/FT1/... folder
Sales conditions for your invoices in PDF form
- In the .../Attachments/NEV/... folder
The delivery conditions for your Delivery Notes in PDF form
Warning ! In case you put files in these folders, they will be sent with ALL related documents.
/POP: text/ -> displaying a popup with your text during
encoding of new document specified in the parameter JouPopup
from ALL.INI file /GTB: text/ -> Get this text back when adding
a new document (Exemple: chassis number of cars - garage). /FAC: CUSTOMER-CODE/ -> When you work with the menu Tools->Regroup
documents, the documents are regroupped in the customer CUSTOMER-CODE. /APPROVER:CUSTOMER-CODE-from the approver/ -> When
using the E-commerce, send a email copy of the order to the approver.
So if the order is approved, the approver can forward the email to the inventory
manager to confirm the order.
Note: To add some specific fields regarding your business, when you add
a new customer :
In all.ini, add this variable (or in menu Tools->Parameters->Miscellaneous
2->ALL->DefFieldsForAddFieldsCustomer) :
Note1: To load some specific fields from the Customer OR products ->Additional
fields, when you load a package in a document from menu Edit->Load
package:
Put the name of the variable in square brackets (example: MyField1)
in the description colum of the document.
When you load the package, the variable from the document descrition will
be replaced with the value (PutHereYourValue1) from the customer or product
additional fields or for any other fields from the Table products or customers
from the database (To obtain the list of the available fields in your database,
please get the module EFYMDBACCESS)
When you import customers-en.xls, you can also import data. fill the columns
with your values after the last column like this :
Additional Fields Products:
/NODISCOUNT/ -> When present in the product record, do not calculate
the discount when using the Files->Documents Settings->Print the total
discount on the document. /PERCENT:Y/ -> When present in the product record, when you input
hte this product in a document, the price is take as discount percentage.
/MESS(customer language):Your message/ -> Work only with (PERCENT:Y).
When present in the product record, this message is printed on the bottom
of the not paid invoices where the duedate is not the same as the invoice
date (message example : )
All the other parameters are in C6 and C14 the setup e-commerce
/NODISCOUNT/ do no calculate the discount at the bottom of the document.
Additional Fields Categories:
/PrintColor:#FF0000/ -> When present in the memo field (for example #FF0000 for RED color) from categorie, print the product description in this HTML color code.
38) Check the validity of a Fiscal or VAT number on the WEB (Top)
(Necessary modules: Free)
To activate the online VAT chekking
On your computer, stop EasyForYou and in the folder c:\...\EasyForYou Edit the file ALL.INI and add a new variable with the url to your server like in this example :
Example for an installation on a Workstation and Nootebook.
In this example, EasyForYou is already installed on the Workstation.
Carefully follow the order of these instructions.
Before you begin:
Make a backup copy in the Tools -> Daily backup at start-up
Make a update Easyforyou (menu Tools -> Update software)
To ease and speed synchronization, delete the help folder in c: \ .... \Easy For You \help
Then download and install Dropbox on the Workstation.
Create an account in DropBox, then share the folder c: \ .... \Easy For You to your Dropbox account
On the Nootebook
Download and install the trial version of EasyForYou
Start the trial version and input te information for your company.
Create a dummy document with clients and product demo and print it.
Enter the activation code (CD-KEY)
Open the folder c: \ .... \ Easy For You (see the installation folder by right clicking on the icon EasyForYou -> Properties)
In this folder c: \ .... \ Easy For You DELETE the files easywin.mdb and easywin.exe
To ease and speed synchronization, delete the help file in c: \ .... \ Easy For You\help
Download and install Dropbox
Share the folder c: \ .... \ Easy For You to to your Dropbox account
After a few minutes, the files will be synchronized and you can work on your Workstation or Nootebook (but not both simultaneously ! To do this see the FAQ No. 40)
On the other hand, the remote folder Dropbox (cloud) is an additional backup security.
40) Rounding management for printing amounts including VAT
(Top)
Some are VAT inclusive, are difficult to obtain (magical prizes) in the documents.
For instance:
100.00 EUR including VAT (21%) = 82.64 EUR excluding VAT
(but 82.64 excluding VAT + 21% VAT = 99.99 EUR including VAT)
To solve this problem, click the Files->Currencies menu and change:
Number of decimals for unit prices: 4
Number of decimals for totals: 4
(leave 2 decimals for printing)
Example with 4 decimals (displays 2 decimals when printing documents):
100.00 EUR including VAT (21%) = 82.6462 EUR excluding VAT
(So 82,6462 excluding VAT + 21% VAT = 100.00 EUR VAT included)
 Print help files ?
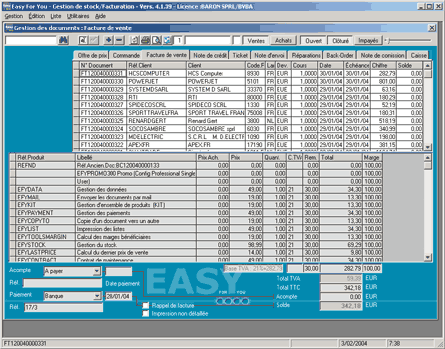
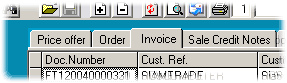
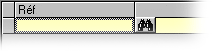

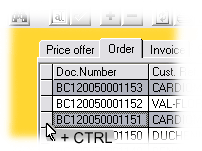
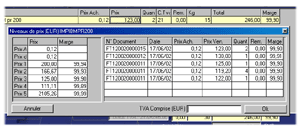
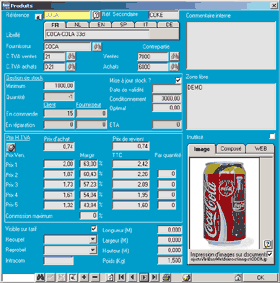
 Code
Code

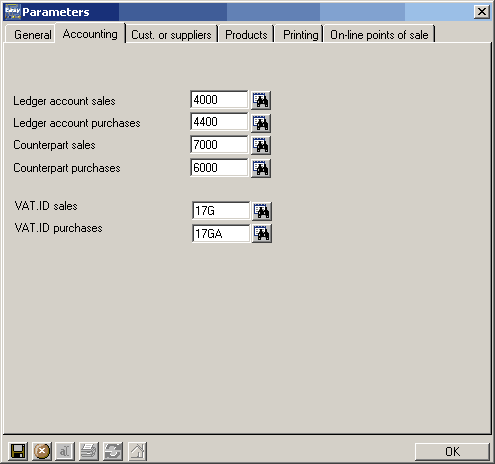
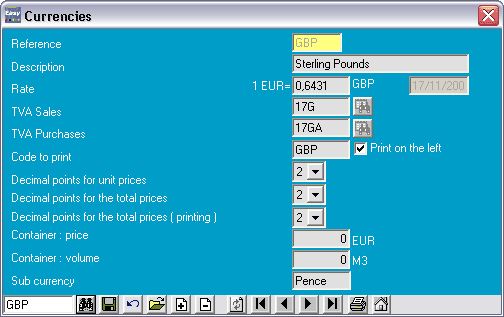
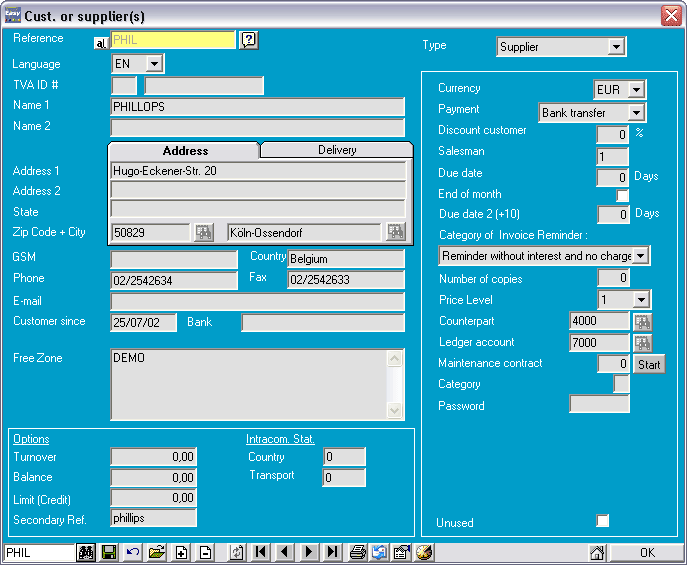
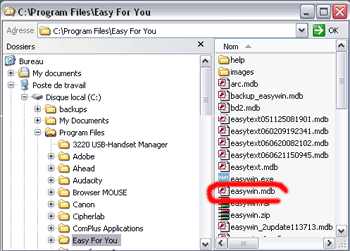
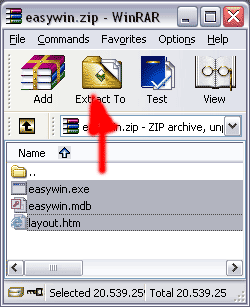
 to pass the text to the line. The comma must be replaced by
  and
and  for the Semicolon and
  for the apostrophe)